In this article, we will explore CRUD operations in .Net5 Blazor WebAssembly application. This article targeting an audience like beginners of Blazor WebAssebly.
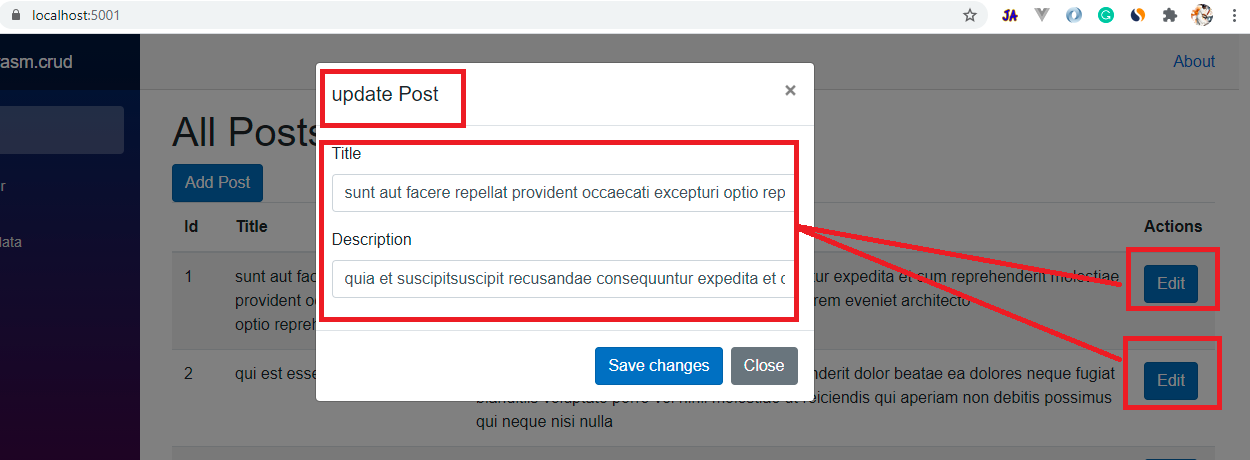
Output on clicking the edit button.
Create A .Net5 Blazor WebAssembly:
Visual Studio users should have the latest version of 2019VS(Version 16.8.*) to build the .Net5 application. From Visual Studio it is pretty simple to create a Blazor WebAssebly application since VS provides users with a nice GUI for interaction.
One other option to create an application is with .Net CLI commands. So one of the best IDE for .Net CLI developers is Visual Studio Code Editor.
.Net CLI Command To Create Blazor WebAssembly Project:
dotnet new blazorwasm -n your_project_name
Rest API:
In the blazor webassembly application, displaying data, storing or updating data, or removing data is carried out by Rest API. So for in our demo application, we will consume a free rest API like 'https://jsonplaceholder.typicode.com/posts'. But there are limitations with these free rest API's they won't support creating or deleting data. So in our demo for creating, update and delete operations we are going to pretend like we really calling API.
If you have knowledge on creating rest API, then it will nice be to create a sample API with all CRUD operations and then use that API in the blazor webassembly application.
Different HttpClient Techniques:
In this demo, we are going to use the 'Type Client' technique. The 'Type Client' technique means creating a specific class to an API domain, in that class we will implement all API calls logic like fetching, updating, and deleting. So each API domain will have an individual POCO class in 'Type Client'.
Install Http Extension Packege:
To use the 'Type Client' technique we need to register our POCO class in the start file using the 'AddHttpClient' service. The 'AddHttpClient' service bundled with the HTTP extension library, so need to install the library mention below.
Package Manager Command:
Install-Package Microsoft.Extensions.Http -Version 5.0.0
.Net CLI Command:
dotnet add package Microsoft.Extensions.Http --version 5.0.0
Create API Response Model:
To use API JSON response into our blazor webassembly application, we have to deserialize the JSON string response to the C# POCO class object. So we have to create an API response model. So let's create a folder like 'Models' and then add a new class like 'Post.cs'.
Models/Post.cs:
namespace dotnet5.bwasm.crud.Models
{
    public class Post
    {
        public int Id { get; set; }
        public string Title { get; set; }
        public string Body { get; set; }
    }
}
Register 'Models' folder namespace in '_Import.razor'. By registering namespaces in '_Imports.razor' we can directly access any class by its name into the razor component. If we don't register the namespace in '_Imports.razor', then we have to call any class with the fully qualified name(means along with namespace) into the razor components._Imports.razor:
@using dotnet5.bwasm.crud.Models
Create 'Type Client' POCO Class To Implement API Calls:
As we have already decided to use the 'Type Client' technique of the HttpClient. So let's create a folder like 'APIClients' and then add a new class like 'JsonPlaceHolderClient.cs'.
APIClients/JsonPlaceHolderClient.cs:
using System.Collections.Generic;
using System.Net.Http;
using System.Net.Http.Json;
using System.Threading.Tasks;
using dotnet5.bwasm.crud.Models;

namespace dotnet5.bwasm.crud.ApiClients
{
    public class JsonPlaceHolderClient
    {
        private HttpClient _httpClient;
        public JsonPlaceHolderClient(HttpClient httpClient)
        {
            _httpClient = httpClient;
        }

        public async Task<List<Post>> GetAllPost()
        {
            return await _httpClient.GetFromJsonAsync<List<Post>>("/posts");
        }
    }
}
- (Line: 12) Injecting the 'HttpClient' object into the 'JsonPlaceHolderClient'. This injection is possible on registering our 'Type Client'(JsonPlaceHolderClient) into the 'AddHttpClient' service extension method in the Program file. While registering our 'Type Client'(JsonPlaceHolderClient) we will specify some default configurations like domain, default headers, connection timeout, etc. So framework while injecting 'HttpClient' into the 'Type Client'(JsonPlaceHolderClient) class it will bundle all the configuration that registered into the 'HttpClient' object. We will register our 'Type Client'(JsonPlaceHolderClient) in the upcoming step.
- (Line: 17-20) A method that fetches a collection of 'Posts'.
- (Line: 19) An asynchronous API call to the "posts" endpoint. The domain for the API automatically appended by the 'HttpClient'. Because 'HttpClient' object contains all our default configurations registered in the 'Program.cs' file.
- The 'GetFrormJsonAsync' method triggers the API call. On receiving JSON string response, our method will automatically deserialize our response to collection 'Posts' of c# object type.
_Imports.razor:
@using dotnet5.bwasm.crud.ApiClients
Register JsonPlaceHolderClient In Progra.cs File:
Using 'AddHttpClient' extension method we have to register our JsonPlaceHolderClient in Program.cs file. It helps to inject the 'HttpClient' object into the 'JsonPlaceHolder' file by the HttpClientFactory implicitly.
Program.cs:
builder.Services.AddHttpClient<JsonPlaceHolderClient>(client => {
	client.BaseAddress = new Uri("https://jsonplaceholder.typicode.com");
});
- The configured base domain of the rest API.
Read Operation In Blazor Component:
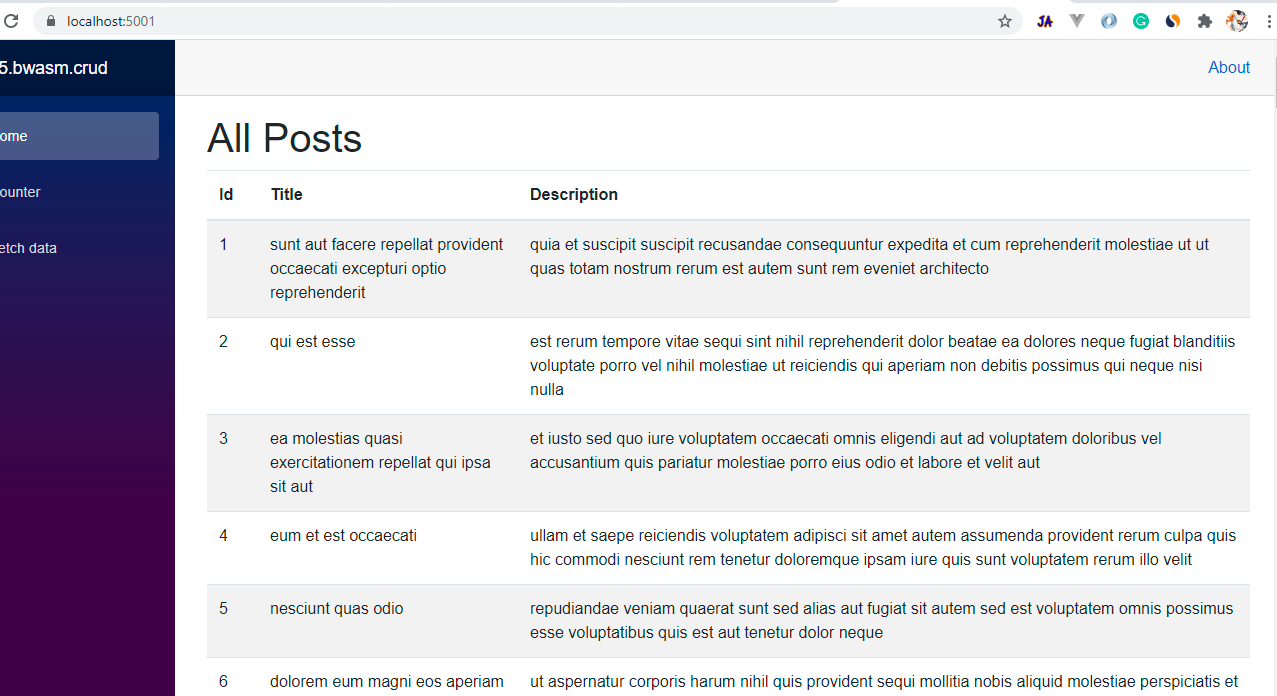
Let's understand how to read or fetch data into the blazor component in the blazor webassembly application. So first clean up the existing code in 'Pages/Index.razor', because in our sample we are going to implement all our CRUD operations in this file.
Pages/Index.razor:(HTML Part)
@page "/"
@inject JsonPlaceHolderClient _jsonPlaceHolderClient;

<h1>All Posts</h1>
<table class="table table-striped">
    <thead>
        <tr>
            <th scope="col">Id</th>
            <th scope="col">Title</th>
            <th scope="col">Description</th>
        </tr>
    </thead>
    <tbody>
        @foreach (var post in allposts)
        {
            <tr>
                <td>@post.Id</td>
                <td>@post.Title</td>
                <td>@post.Body</td>
            </tr>
        }
    </tbody>
</table>
- (Line: 1) Razor syntax to define the route for the blazor page component can be done by the '@page' directive.
- (Line: 2) Here 'JsonPalceHolderClient' instance injected using '@inject' directive.
- Rendering the 'Posts' data into the table for display. Here 'allposts' variable contains the data fetched from the API.
@code{
    private List<Post> allposts = new List<Post>();

    protected override async Task OnInitializedAsync()
    {
        allposts = await _jsonPlaceHolderClient.GetAllPost();
    }
}
- (Line: 2) The 'allposts' variable holds the data from the API. This variable will be used by Html code to display the content.
- The 'OnIntializedAsync' method gets invoked on rendering of the blazor component. Since we also need to display the content on the page opens, we will invoke our API in this method.
Post API Call:
We know that our test API "http://jsonplaceholder.typicode.com/posts" doesn't support create or update or delete operations. But we pretend like it will support all those operations and implement the logic so that when we expose ourselves to real application it will be helpful.
In real-time most of the APIs can support the creation and update with a single endpoint, our logic will be implemented by considering this scenario. Let's add our logic for 'CreateOrUpdatePost' method in 'JsonPlaceHolderClient'.
ApiClients/JsonPlaceHolderClient.cs:
public async Task<Post> CreateOrUpdatePost(Post newPost)
{
	#region  for-real-appliation-development
	// var response = await _httpClient.PostAsJsonAsync<Post>("/create", newPost);
	// return await response.Content.ReadFromJsonAsync<Post>();
	#endregion
	#region  dummy-implementation-for-demo
	await Task.FromResult(0);
	return newPost;
	#endregion
}
- (Line: 3-6) Here is commented code, because this is the appropriate approach to implement when we have a working endpoint. The 'PostAsJsonAsync<T>' method invokes the save or update endpoint. The type passed to the method 'PostAsJsonAsync' nothing but the type of the payload. Behind the scenes 'PostAsJsonAsync' serializes payload and sends it to the API and captures the 'HttpResponseMessage'. Here from the response, we are trying to read the 'Post' object, but response data can be vary based on API implementation like few API's return the primary key or unique identifier of the record or few API's return full object like above.
- (Line: 7-10) For demo purposes simply returning the input 'Post' object.
Scripts To Interact With Bootstrap Modal Popup:
For creating a new record or updating a record we will be going to open up the bootstrap modal with form. So to do this we have to write some javascript code as well.
Now we have to create a JS file in which we have to write javascript logic for opening and closing of the bootstrap modal popup. These javascript methods will be invoked by the .net code in upcoming steps. Create a folder 'js' inside of the 'wwwroot' folder and then add a file like 'app.js'
wwwroot/js/app.js:
window.global = {
  openModal: function (popupId) {
    popupId = "#" + popupId;
    $(popupId).modal("show");
  },
  closeModal: function (popupId) {
    popupId = "#" + popupId;
    $(popupId).modal("hide");
  },
};
- Here we have 2 javascript functions for opening and closing the bootstrap modal. These methods are written like generic, by inputting any modal id can be able to open and close.
wwwroot/index.html:
<script
src="https://code.jquery.com/jquery-3.5.1.min.js" integrity="sha256-9/aliU8dGd2tb6OSsuzixeV4y/faTqgFtohetphbbj0="
crossorigin="anonymous">
</script>
<script
src="https://cdn.jsdelivr.net/npm/bootstrap@5.0.0-beta2/dist/js/bootstrap.bundle.min.js" integrity="sha384-b5kHyXgcpbZJO/tY9Ul7kGkf1S0CWuKcCD38l8YkeH8z8QjE0GmW1gYU5S9FOnJ0" crossorigin="anonymous">
</script>
<script
src="js/app.js">
</script>
Create Or Update Operations In Blazor Component:
Now we have to update our component to perform both create and update operations.
Pages/Index.razor:(Html Part)
@page "/"
@inject JsonPlaceHolderClient _jsonPlaceHolderClient;
@inject IJSRuntime _js;

<h1>All Posts</h1>
<button class="btn btn-primary" @onclick='@(e => OpenModal(0,"add"))'>Add Post</button>
<table class="table table-striped">
    <!-- code Hiden for display purpose -->
    <tbody>
        @foreach (var post in allposts)
        {
            <tr>
                <!-- code Hiden for display purpose -->
                <td>
                    <button type="button" class="btn btn-primary"
                        @onclick='@(e => OpenModal(post.Id,"update"))'>Edit</button>
                </td>
            </tr>
        }
    </tbody>
</table>

<!-- Html for Model for for creating or updating 'post' data -->
<div class="modal" tabindex="-1" role="dialog" id="myModal">
    <div class="modal-dialog" role="document">
        <div class="modal-content">
            <div class="modal-header">
                <h5 class="modal-title">@formTitle</h5>
                <button type="button" class="close" @onclick="(e => CloseModal())" aria-label="Close">
                    <span aria-hidden="true">×</span>
                </button>
            </div>
            <div class="modal-body">
                <div class="form-group">
                    <label for="txtTitle">Title</label>
                    <input type="text" class="form-control" id="txtTitle" @bind="payload.Title">
                </div>
                <div class="form-group">
                    <label for="txtDescription">Description</label>
                    <input type="text" class="form-control" id="txtDescription" @bind="payload.Body">
                </div>
            </div>
            <div class="modal-footer">
                <button type="button" class="btn btn-primary" @onclick="(e => CreateOrUpdatePost())">Save changes</button>
                <button type="button" class="btn btn-secondary" @onclick="(e => CloseModal())">Close</button>
            </div>
        </div>
    </div>
</div>
- (Line: 3) Injected IJSRuntime, the IJSRuntime will be used to invoke the javascript code from the dotnet code.
- (Line: 6) Added a button to create a new 'Post'. On clicking the button we are invoking the bootstrap modal by calling the 'OpenModal' method. Here we are returning the method 'OpenModal' as an output for the click event like "(e => OpenModal())". The 'OpenModal' method takes 2 input parameter like 'postId' and 'operationType'. The 'postId' value is '0' then a popup triggered for creating the new record. The 'operationType' value will be 'add' it also defines the operation for adding a new record.
- (Line: 15-16) Added new column like actions in the table. Here we added an edit button to open the form with the record values to be edited.
- (Line: 24-49) Html code of bootstrap modal that contains a form to operate on 'Post' data.
- (Line: 28) The property 'formTitle' will be rendered at the top of the form. On clicking the 'Add' or 'Edit' button content of the 'formTitle' changes
- (Line: 38-40) Modal created with a cross button to close the popup. Register the click event with a method name like 'CloseModal'.
- (Line: 36-40) Input fields are decorated with the '@bind' directive to enable the 2-way binding in the blazor webassembly.
- (Line: 44) The 'Save Changes' button registered with a click event to a method 'CreateOrUpdatePost'.
- (Line: 45) The 'Close' button registered with a click event to a method 'CloseModal'.
Pages/Index.razor:(Code Part)
@code{
    private List<Post> allposts = new List<Post>();
    private Post payload = new Post();

    string formTitle = "";
    protected override async Task OnInitializedAsync()
    {
        allposts = await _jsonPlaceHolderClient.GetAllPost();
    }

    private async Task OpenModal(int postId, string operationType)
    {
        if (operationType.ToLower() == "add")
        {
            formTitle = "Add Post";
            payload = new Post();
            await _js.InvokeVoidAsync("global.openModal", "myModal");
        }
        else
        {
            formTitle = "update Post";
            payload = allposts.Where(_ => _.Id == postId).FirstOrDefault();
            await _js.InvokeVoidAsync("global.openModal", "myModal");
        }
    }

    private async Task CloseModal()
    {
        await _js.InvokeVoidAsync("global.closeModal", "myModal");
    }

    private async Task CreateOrUpdatePost()
    {
        if (payload.Id == 0)
        {
            // for adding new record
            var newRecord = await _jsonPlaceHolderClient.CreateOrUpdatePost(payload);

            #region logic-only-for-demo
            int lastRecordId = allposts.OrderByDescending(_ => _.Id).Select(_ => _.Id).FirstOrDefault();
            newRecord.Id = lastRecordId + 1;
            #endregion
            allposts.Insert(0, newRecord);
            await CloseModal();
        }
        else
        {
            var updatedRecord = await _jsonPlaceHolderClient.CreateOrUpdatePost(payload);

            allposts = allposts.Where(_ => _.Id != updatedRecord.Id).ToList();

            allposts.Insert(0, updatedRecord);
            await CloseModal();
        }
    }
}
- (Line: 3) The 'payload' variable will be used by our bootstrap modal form. This object will be used for editing or creating 'Post'record by capturing the user entered data from the form.
- (Line: 5) The 'formTitle' variable to display the title of modal form dynamically.
- (Line: 11-25) Method 'OpenModal' to open the bootstrap modal by clicking the 'Edit' or 'Add' button.
- (Line: 13-18) This block of logic executes on clicking the 'Add' button.
- (Line: 16) Assigning empty 'Post' object to the 'payload' variable, so that form fields will be empty on modal opens.
- (Line: 17&23) Here invoking the javascript code from the dotnet code. The 'InvokeVoidAsyc' method contains two parameters like the first parameter is the name of the javascript function and the second parameter is input values to that javascript function.
- (Line: 19-24) This block of logic executes on clicking the 'Edit' button.
- (Line: 22) On clicking the edit button the 'Post' record id is passed as an input parameter to the 'OpenModal' method. So using that post id we have to filter the record that needs to be edited from the 'allposts'(variable that contains all post data). So filtered object will be assigned to the 'payload' variable, then the modal form will be populated with data to edit it.
- (Line: 27-30) A method that closes the bootstrap modal on clicking the close button.
- (LIne: 32-55) The 'CreateOrUpdatePost' method contains logic to invoke the API to save or update the record by clicking the 'SaveChanges' button on the bootstrap modal.
- (Line: 34) Checking condition for adding new 'Post' record.
- (Line: 37) Invoking our save API call where we pass our 'payload' variable data as input to it.
- (Line: 39-42) Here it is fake logic because we know that our test API won't support add or update data so for the demo purpose we are incrementing record id manually as pretending like a record is saved in the server.
- (Line: 43) Now the new record is added at top of collection, so that it will be displayed on the top of the table.
- (Line: 46-54) This block of code contains the logic, to update the record. Hereafter invoking the save API we removing the existing record from the collection and then inserting the updated record on top of the collection.
Output on clicking the edit button.
Delete API Call:
ApiClients/JsonPlaceHolderClient:
public async Task DeletePost(int id)
{
	#region  for-real-application
	// await _httpClient.DeleteAsync($"delete?id={id}");
	#endregion

	#region dummy-implementation-for-demo
	await Task.FromResult(0);
	#endregion
}
- We know that our test API doesn't support delete API, here we just commented out the actual code. But this commented code will be helpful when we have a working delete endpoint.
Delete Operation In Blazor Component:
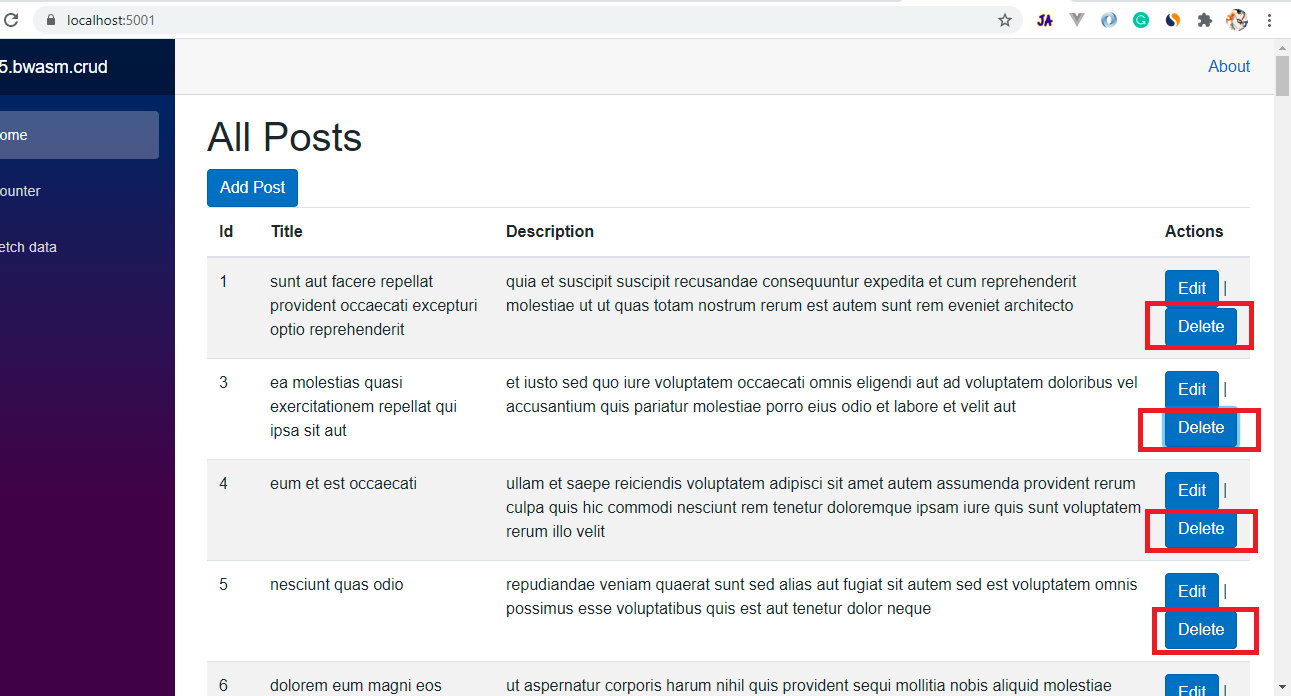
We have to add the 'Delete' button in the table like we added the 'Edit' button previously, then we have to register the click event with a method that should contain logic to invoke the delete API and on the success of the delete API we have to remove the item from the collection of 'Posts' that is stored in variable 'allposts'.
Pages/Import.razor:(Html Part)
<button type="button" class="btn btn-primary"
@onclick='@(e => DeletePost(post.Id))'>Delete</button>
Pages/Import.razor:(Code Part)
private async Task DeletePost(int id)
{
	await _jsonPlaceHolderClient.DeletePost(id);
	allposts = allposts.Where(_ => _.Id != id).ToList();
}
So that's all about the steps to implement CRUD operation .Net5 blazor webassembly application.Video Session:
Support Me!
Buy Me A Coffee
PayPal Me
Wrapping Up:
Hopefully, I think this article delivered some useful information on steps to implement CRUD operations in the .net5 blazor webassembly application. I love to have your feedback, suggestions, and better techniques in the comment section below.


it would be better with real SQL Server database .InvokeVoidAsync("global.closeModal .. not working and complicated to run
ReplyDeleteBlazor Webassembly dont use database directly. It consumes only Api's. Global.closeModal will work, either clone my repo or check blog again
DeleteHi Naveen.
ReplyDeleteWebAssemly with GraphQL Client?
Hey I tried strawberry shake Library but not working with .net5 currently
Delete