In this article, we are going to understand the different file operations like uploading, reading, downloading, and deleting in .Net5 Web API application using Azure Blob Storage.
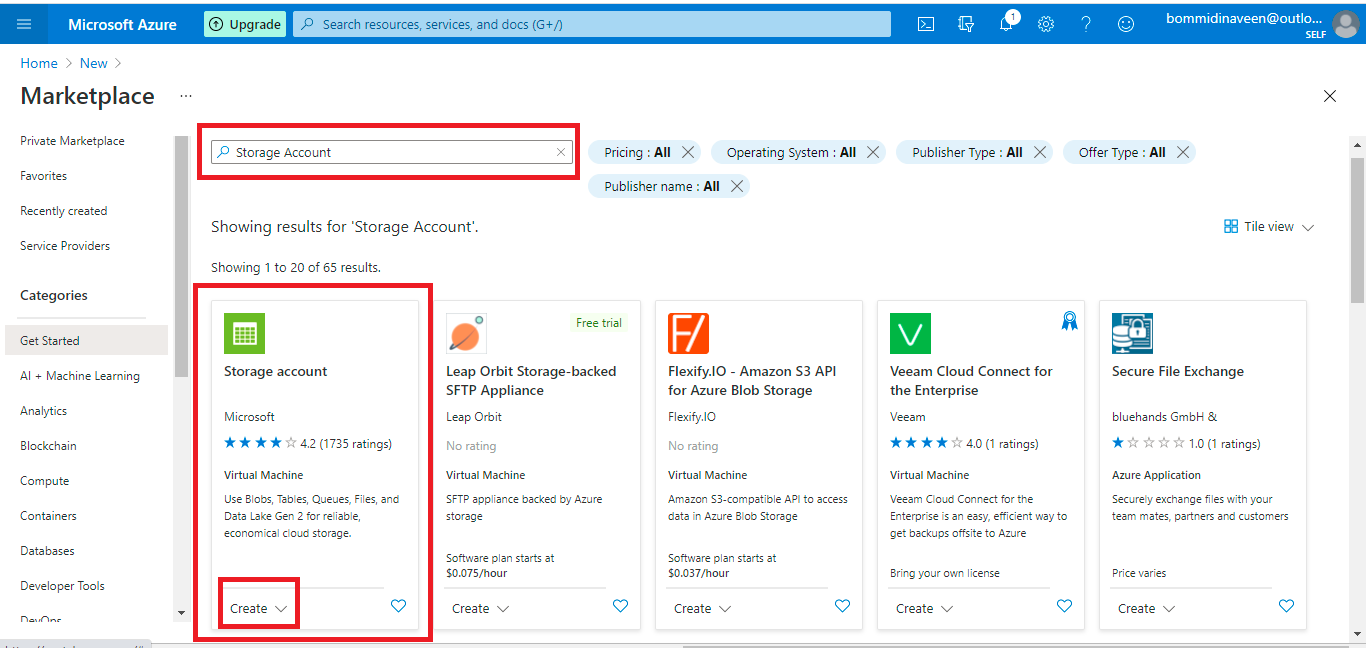
Search for 'Storage Account' and select to create.
Fill 'Create Storage Account' form.
Azure Blob Storage:
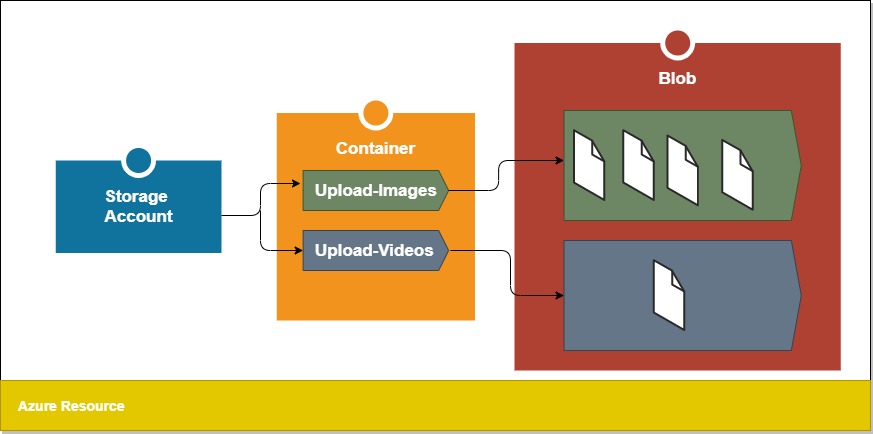
Azure blob storage is Microsoft cloud storage. Blob storage can store a massive amount of file data as unstructured data. The unstructured data means not belong to any specific type, which means text or binary data. So something like images or pdf or videos to store in the cloud, then the most recommended is to use the blob store.
The key component to creating azure blob storage resource:
Storage Account:-
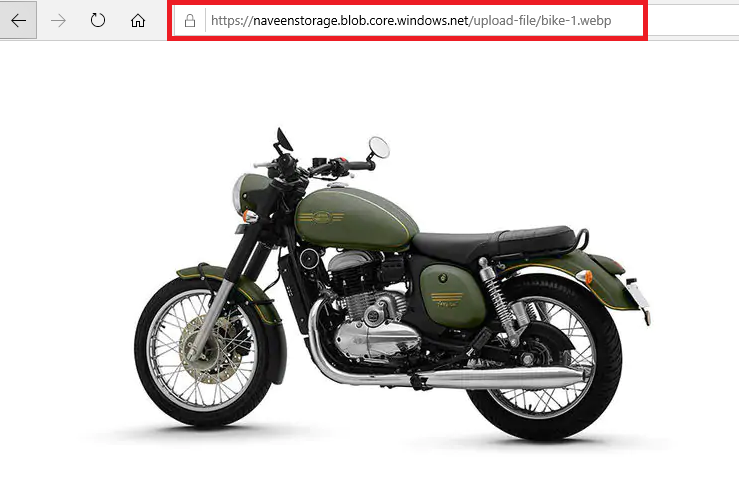
A Storage account gives a unique namespace in Azure for all the data we will save. Every object that we store in Azure Storage has an address. The address is nothing but the unique name of our Storage Account name. The combination of the account name and the Azure Storage blob endpoint forms the base address for each object in our Storage account. For example, if our Storage Account is named as 'myazurestorageaccount' then the base address will be like 'https://myazurestorageaccount.blob.core.windows.net'.
Containers:-
The containers are like folders in the file system. So storage account can have an unlimited number of containers. Inside each container can have an unlimited number of blobs.
Blobs:-
Azure gives 3 types of blobs:
- Block Blobs - Block of data managed individually. Most recommended for file uploading.
- Append Blobs - Contains Block of data but with append operation.
- Page Blogs
Create Azure Blob Storage In Azure Portal:
To consume any azure service we have to signup for the Azure portal, an additional bonus of the azure portal is users can use most of the service with free subscriptions. The free subscription is very handy for developers to learn about the azure service.
On the Azure portal dashboard page click on 'Create a resource'.
- 'Resource group' - enter the name of the resource group. Resource groups are just separators or wrappers.
- 'Storage account name' - enter the unique name and this name will be used for creating the base address.
- 'Location - you can select the default or choose your nearest location value.
- 'Performance' - chose your preferred option(for free subscription go for the 'Standard' option)
- 'Account Kind' - 'StorageV2(general purpose v2)' is the recommended option.
- 'Replication' - chose your preferred option or select the default option.
Then remaining tabs you can skip or chose for creating the Storage Account.
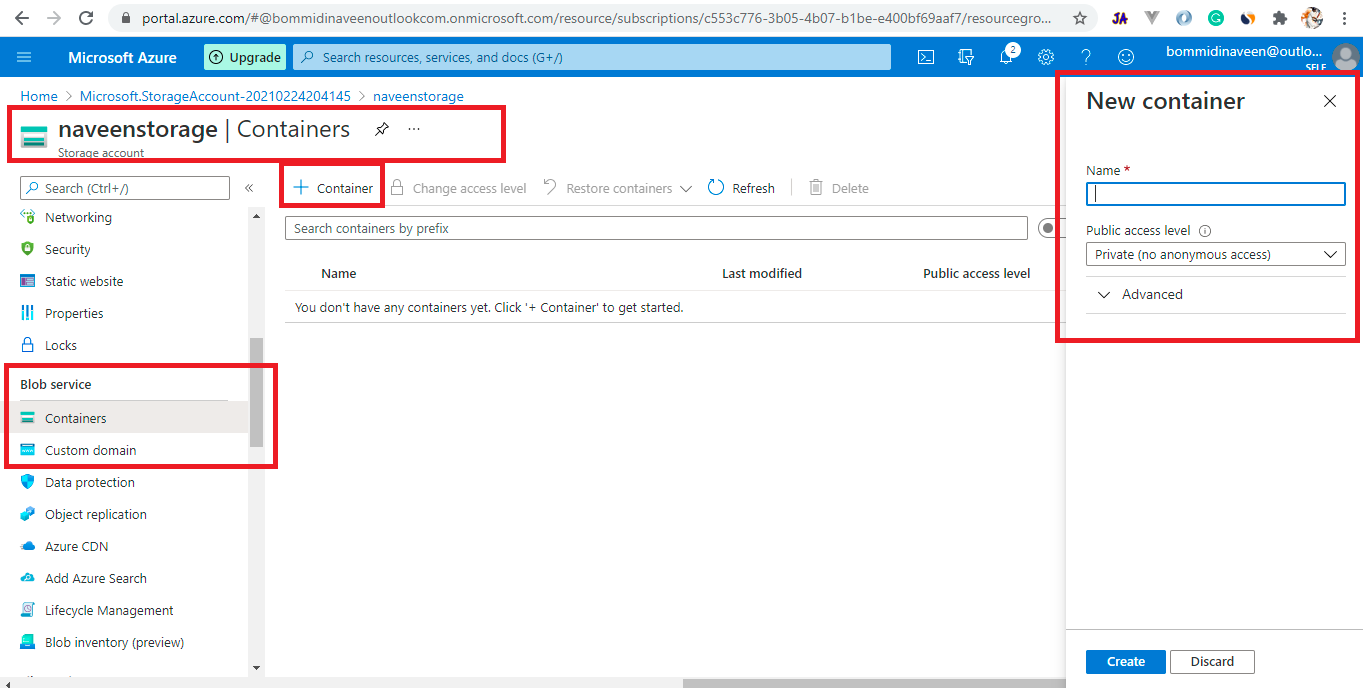
Once storage created. In the left side menu under 'Blob Service' select 'Containers' then click on Create new container which opens a form for creation.
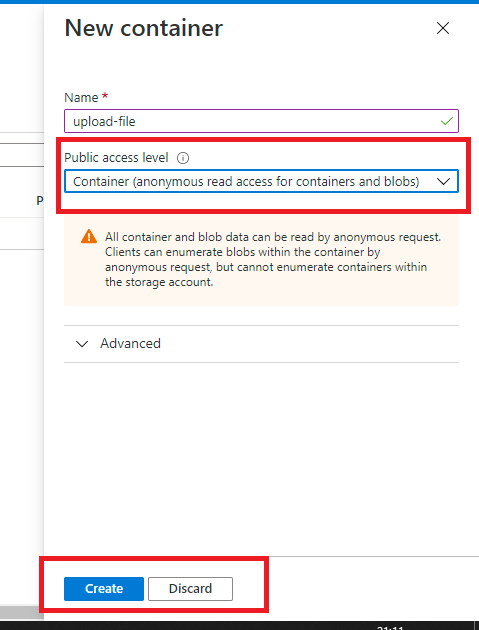
Inside of the 'New Container' form, enter your Container name and then select option 'access level' for the container.
Now while creating the container I'm assigning access level 'anonymous read access for container and blob' which gives permission to access the blobs with the domain address directly.
Create A .Net5 Web API Application:
Let's create .Net5 Web API application to implement our demo on Azure Blob Storage. The most recommended IDEs are Visual Studio 2019(Version 16.8.* supports .Net5) or Visual Studio Code.
Install Azure Blob .Net Packge:
Microsoft provides a .Net library to communicate with the Azure Blob Storage.
Package Manager:
Install-Package Azure.Storage.Blobs -Version 12.8.0
.Net CLI
dotnet add package Azure.Storage.Blobs --version 12.8.0
Add Azure Storage Account ConnectionString:
So to consume Azure Blob Storage into our Web API application we need to use 'ConnectionString' to establish a secured connection.
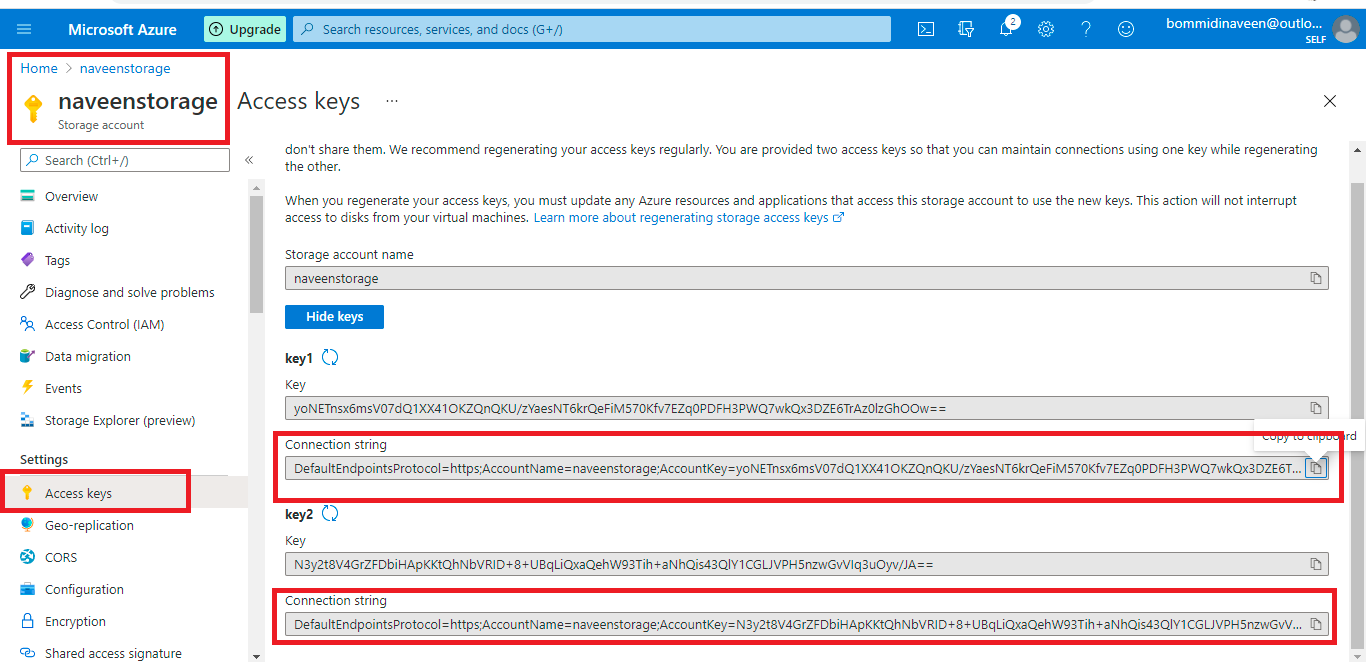
In Azure Storage Account, left-hand side under settings select 'Access Keys' menu and it will displays 'key1' and 'key2' access keys. We can choose any one connection string into our Web API application.
Now add the anyone connection string into the 'appsettings.Development.json' file.
appsettings.Development.json:
"ConnectionStrings": {
    "AzureBlobStorage":"your_azure_connection"
}
Register BlobServiceClient:
In a startup.cs file needs to register the 'Azure.Storage.Blobs.BlobServiceClient' so that it can be injected throughout our application where ever we need it. BlobServiceClient needs our azure connection string so we need to pass it as well.
Startup.cs:
services.AddScoped(_ => {
  return new BlobServiceClient(Configuration.GetConnectionString("AzureBlobStorage"));
});
Create API Endpoint To Upload Files To Azure Blob Storage:
Let's create a payload model for our upload API.
Models/FileModel.cs:
using Microsoft.AspNetCore.Http;

namespace AzureBlob.Api.Models
{
    public class FileModel
    {
        public IFormFile ImageFile{get;set;}
    }
}
- The 'Microsoft.AspNetCore.Http.IFormFile' type can read the stream of file data from the client upload files.
Logics/IFileManagerLogic.cs:
using System.Threading.Tasks;
using AzureBlob.Api.Models;

namespace AzureBlob.Api.Logics
{
    public interface IFileManagerLogic
    {
        Task Upload(FileModel model);
    }
}
Create an implementation file like 'FileManagerLogic.cs' which will implement all abstract methods of 'IFileManagerLogic.cs'.Logics/FileManagerLogic.cs:
using System.Threading.Tasks;
using Azure.Storage.Blobs;
using AzureBlob.Api.Models;

namespace AzureBlob.Api.Logics
{
    public class FileManagerLogic: IFileManagerLogic
    {
        private readonly BlobServiceClient _blobServiceClient;
        public FileManagerLogic(BlobServiceClient blobServiceClient)
        {
            _blobServiceClient = blobServiceClient;
        }

        public async Task Upload(FileModel model)
        {
            var blobContainer = _blobServiceClient.GetBlobContainerClient("upload-file");

            var blobClient = blobContainer.GetBlobClient(model.ImageFile.FileName);

            await blobClient.UploadAsync(model.ImageFile.OpenReadStream());
        }
    }
}
- (Line: 10) Injecting 'Azure.Storage.Blobs.BlobServiceClient'.
- (Line: 15-22) Azure blob storage file uploading logic.
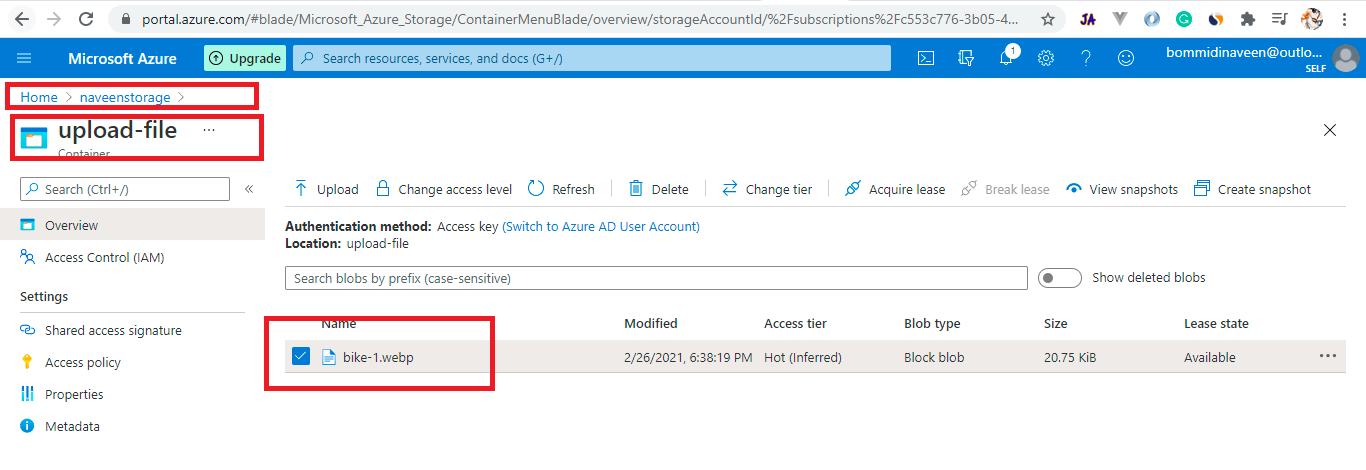
- (Line: 17) The 'GetBlobContainerClient' create the instance of the 'BlobContainerClient'. To this method, we need to pass our container name that was created in the Azure. In my sample, my container name is "upload-file".
- (Line: 19) The 'GetBlobClient' method creates the instance of the 'BlobClient'. To this method, we need to pass the image name, this name will be given for our uploaded image to the Azure Blob Storage.
- (Line: 21) The 'UploadAsync' method will upload our file stream to the Azure Blob Storage.
Startup.cs:
services.AddScoped<IFileManagerLogic, FileManagerLogic>();Create a controller like 'ImageController.cs', inside of it add action method for uploading the file.
Controllers/ImageController.cs:
using System.Threading.Tasks;
using AzureBlob.Api.Logics;
using AzureBlob.Api.Models;
using Microsoft.AspNetCore.Mvc;
namespace AzureBlob.Api.Controllers
{
    [ApiController]
    [Route("[controller]")]
    public class ImageController : ControllerBase
    {
        private readonly IFileManagerLogic _fileManagerLogic;

        public ImageController(IFileManagerLogic fileManagerLogic)
        {
            _fileManagerLogic = fileManagerLogic;
        }

        [Route("upload")]
        [HttpPost]
        public async Task<IActionResult> Upload([FromForm]FileModel model)
        {
            if (model.ImageFile != null)
            {
               await  _fileManagerLogic.Upload(model);
            }
            return Ok();
        }
    }
}
- (Line: 13) Injected 'IFileManagerLogic'
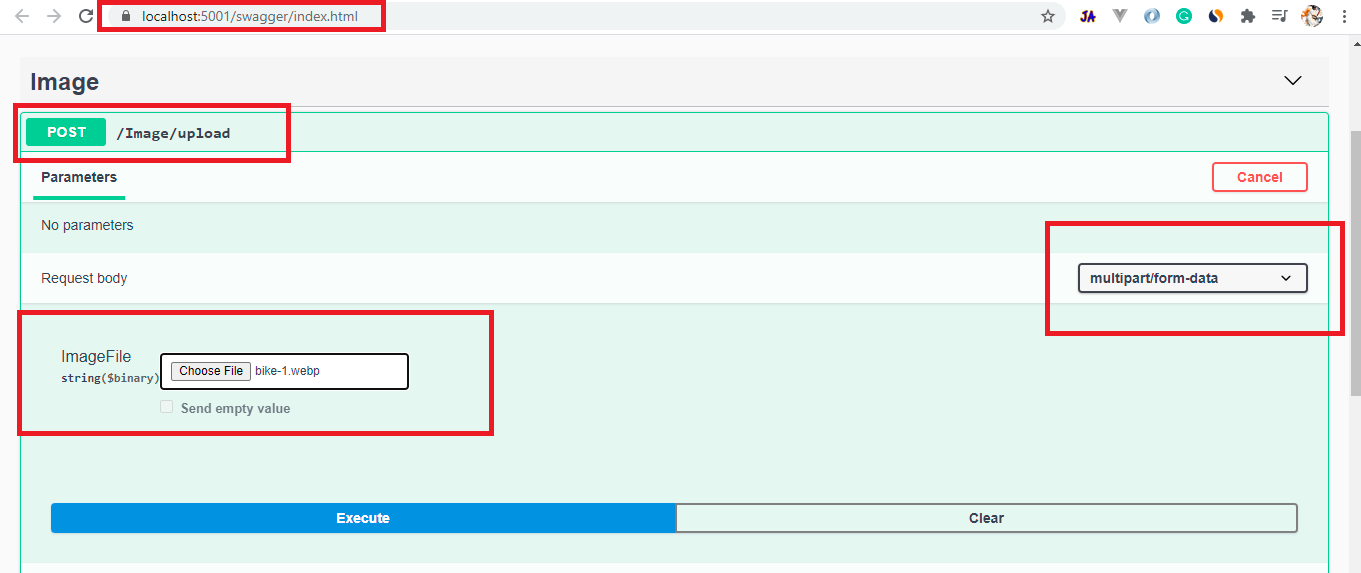
- (Line: 18-27) Action method for uploading the file. The attribute '[FromForm]' to read the file data from our form data that's going to be posted by the client.
Endpoint To Fetch Image From Azure Blob Storage:
One way to access the image from the Azure Blob Storage is accessing directly with the Azure base address.
Another way is from the Web API endpoint to read a stream of the image from the Azure Blob Storage. First, let's create an abstract method like 'Get(string fileName)' in 'IFileManagerLogic.cs'.Logics/IFileManagerLogic.cs:
Task<byte[]> Get(string imageName);Now let's implement logic to fetch the stream of data from the Azure Blob Storage in 'FileManagerLogic.cs'.
Logics/FileManagerLogic.cs:
public async Task<byte[]> Get(string imageName)
{
	var blobContainer = _blobServiceClient.GetBlobContainerClient("upload-file");

	var blobClient = blobContainer.GetBlobClient(imageName);
	var downloadContent = await blobClient.DownloadAsync();
	using (MemoryStream ms = new MemoryStream())
	{
		await downloadContent.Value.Content.CopyToAsync(ms);
		return ms.ToArray();
	}
}
- (Line: 1) The 'Get' method expects the file name as an input parameter. The return type for this method is an array of byte data.
- (Line: 3) Creating the instance of 'BlobConainer' by configuring our container name like 'upload-file'.
- (Line: 5) Creating the instance of 'BlobClient' by configuring our image file name.
- (Line: 6) The 'DownloadAsync' method communicates with the Azure Blob Storage and downloads our image from the specified container.
Controllers/ImageController.cs:
[Route("get")]
[HttpGet]
public async Task<IActionResult> Get(string fileName)
{
	var imgBytes = await _fileManagerLogic.Get(fileName);
	return File(imgBytes, "image/webp");
}
- Here we output the bytes array of image data from the 'File' object.
Endpoint Download File:
For image download, we can use the logic that was implemented for fetching the image. So here we can simply consume the method 'Get(string fileName)' from the 'FileManagerLogic.cs'.
Controllers/ImageController.cs:
[Route("download")]
[HttpGet]
public async Task<IActionResult> Download(string fileName)
{
	var imagBytes = await _fileManagerLogic.Get(fileName);
	return new FileContentResult(imagBytes, "application/octet-stream"){
		FileDownloadName = Guid.NewGuid().ToString()+".webp",
	};
}
- (Line: 5) Getting image as byte array format.
- Retruning 'FileContentResult' object by inputing our image byte array data. The content type "application/octet-stream" instructs the browser to download the file. Here we specifying the name of the image after downloading.
Video Session:
Support Me!
Buy Me A Coffee
PayPal Me
Wrapping Up:
Hopefully, I think this article delivered some useful information of approaches to consume Azure Blob Storage in .Net5 Web API. I love to have your feedback, suggestions, and better techniques in the comment section below.
.png)







It is a really good blog and saved my lot of time. I liked the way it is explain all steps in detail.
ReplyDeleteVery nice explanation
ReplyDeletereally amazing blog thanks for your time to wrote this blog
ReplyDelete