In this article, we are going to understand the steps for installing and creating the Ionic5 sample application using Vue and also run our sample on the android mobile device emulator.
Now let's create 2 view page components in our sample application like 'Home.vue' and 'Todos.vue'.
Let's create a master layout for our sample application.
Create A Sample App Of Ionic5 Using Vue :
To begin to create an Ionic application, we should have the Ionic CLI installed in our system environment.
Command to install latest Ionic CLI:
npm install -g @ionic/cli@latest
Now run the following command to create Ionic5 using the Vue application.
Command to create Ionic Vue application
ionic start your_app_name blank --type vue
By default Ionic provides few templated projects here I'm creating the 'blank' project.TypeScript Or Javascript:
By default Ionic sample created with the support of TypeScript in any library like angular, react, and vue. Typescript can be chosen to develop our application. But in the case of Vue most of the developers or preferred to choose javascript syntax instead of Typescript for application development. So to make our Ionic Vue application use javascript we need to remove few Typescript references, so follow the below steps.
- Remove TypeScript dependencies.
command to unistall the typescript dependencies
npm uninstall --save typescript @types/jest @typescript-eslint/eslint-plugin @typescript-eslint/parser @vue/cli-plugin-typescript @vue/eslint-config-typescript- We need to change the file extensions from ".ts" to ".js", we mostly have 2 '.ts files' like 'main.ts' and 'router/index.ts'.
- In the '.eslintrc.js' file needs to remove the '@vue/typescript/recommended' from the 'extends' array property and next need to remove the @typescript-eslint/no-explicit-any': 'off' property from the rules object.
- Now remove the 'Array<RouteRecordRaw>' type in 'router/index.js'.
- Delete the 'shims-vue.d.ts' file.
- Remove the 'lang="ts"' attribute on script tag in our '.vue' files like 'App.vue' and 'view/Home.vue'.
Create Pages Vue Components:
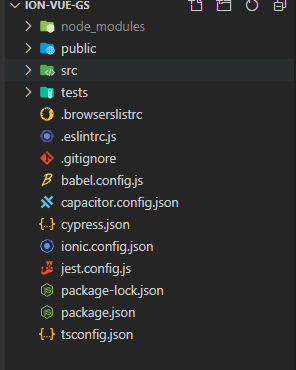
Before creating our page vue components let's restructure our project template like:
- Delete the 'views/Home.vue' file and 'views' folder.
- Remove the 'Home.vue' component route and its references from the 'router/index.js' file.
src/pages/Home.vue:
<template>
    <div>
        <h3>Welcome To Demo On Ionic5 with Vue</h3>
    </div>
</template>
<script>
export default {

}
</script>
src/pages/Todos.vue:
<template>
    <div>
        Todo's List
    </div>
</template>
<script>
export default {

}
</script>
Now configure the routes for our newly created page componentssrc/router/index.js:
import { createRouter, createWebHistory } from "@ionic/vue-router";

import Home from "../pages/Home.vue";
import Todos from "../pages/Todos.vue";

const routes = [
  {
    path: "/",
    redirect: "/home",
  },
  {
    path: "/home",
    component: Home,
  },
  {
    path: "/todos",
    component: Todos,
  },
];

const router = createRouter({
  history: createWebHistory(process.env.BASE_URL),
  routes,
});

export default router;
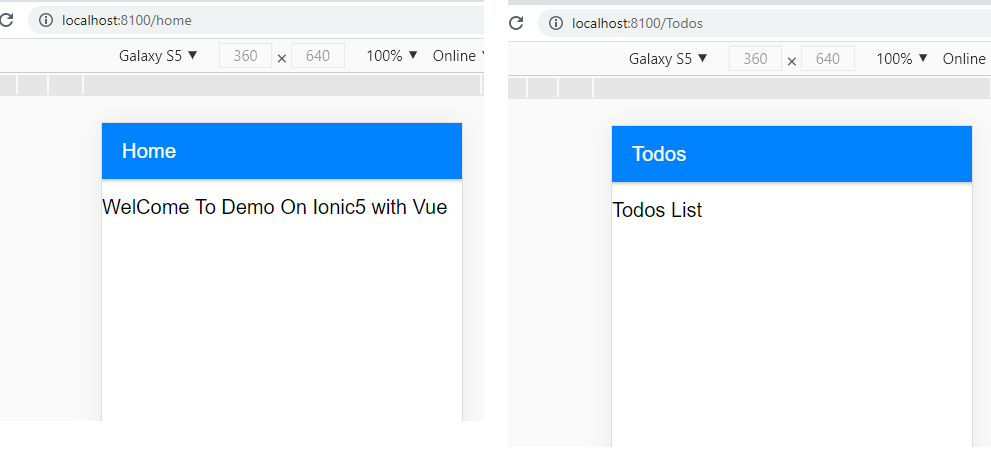
Command to run the application
ionic serve
Add Master Layout Vue Component:
Till now our sample application doesn't have any layout like header, footer, etc. Now we have to define a master template for our application which will be applied for all the pages. The core ionic components to define the layout vue component are like:
- IonPage
- IonHeader
- IonContent
- IonTitle
- IonToolbar
src/components/MainLayout.vue:
<template>
    <ion-page>
        <ion-header>
            <ion-toolbar>
                <ion-title>{{pageTitle}}</ion-title>
            </ion-toolbar>
        </ion-header>
        <ion-content>
            <slot></slot>
        </ion-content>
    </ion-page>
</template>
<script>
import { IonPage, IonHeader, IonContent, IonTitle, IonToolbar } from '@ionic/vue';
export default {
    components:{
        IonPage,
        IonHeader,
        IonContent,
        IonTitle,
        IonToolbar
    },
    props:['pageTitle']
}
</script>
- Here we have defined our master template using the Ionic core components.
- The '<slot>' tag is the area in which our routed page content will be rendered.
- The page title of each page will be passed dynamically using the input properties using the 'props'.
src/main.js:
import MainLayout from  './components/MainLayout.vue';
// code hidden for display purpose

app.component('main-layout',MainLayout);
Now update our page components to use the layout components.src/pages/Home.vue:(Html Part)
<template>
    <main-layout pageTitle="Home">
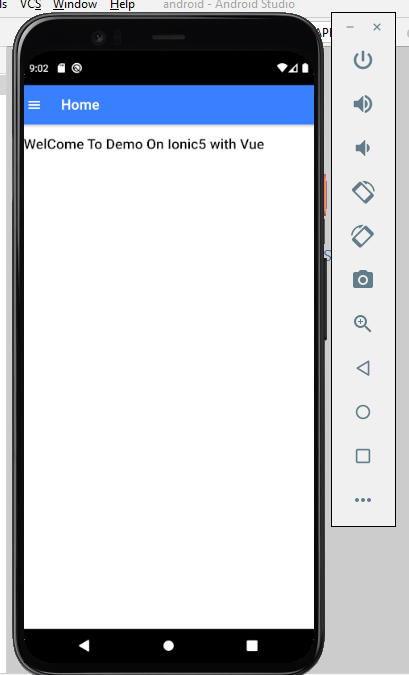
        <h4>WelCome To Demo On Ionic5 with Vue</h4>
    </main-layout>
</template>
- Here we have defined everything inside of the layout component and also passing the 'pageTitle' input parameter
<template>
    <main-layout pageTitle="Todos">
        <h4>Todos List</h4>
    </main-layout>
</template>
Add Styling:
HTML has the ability to add the styles based on the tags as well similarly in ionic also we add the styles based on the Ionic component element tag. But to add styles to the ionic component element tag we need to follow the original documentation from the ionic because we can only add style by overriding the configuration provided by the Ionic, so we need to check only those style configurations of each Ionic component.
So in this sample, I'm going to add some styles to my 'IonToolbar' component. so let's create styles file for our MasterLayout component.
src/theme/layout.css:
ion-toolbar{
    --background: var(--ion-color-primary);
    --color: var(--ion-color-primary-contrast);
}
- Here we can observe that trying to add styles to IonToolbar. Here also observe the style configurations like '--background' and '--color' provided by IonToolbar component. The value are we assigned are CSS variables that load from the 'src/theme/variable.css' file.
src/main.js:
import './theme/layout.css';
Add Menu:
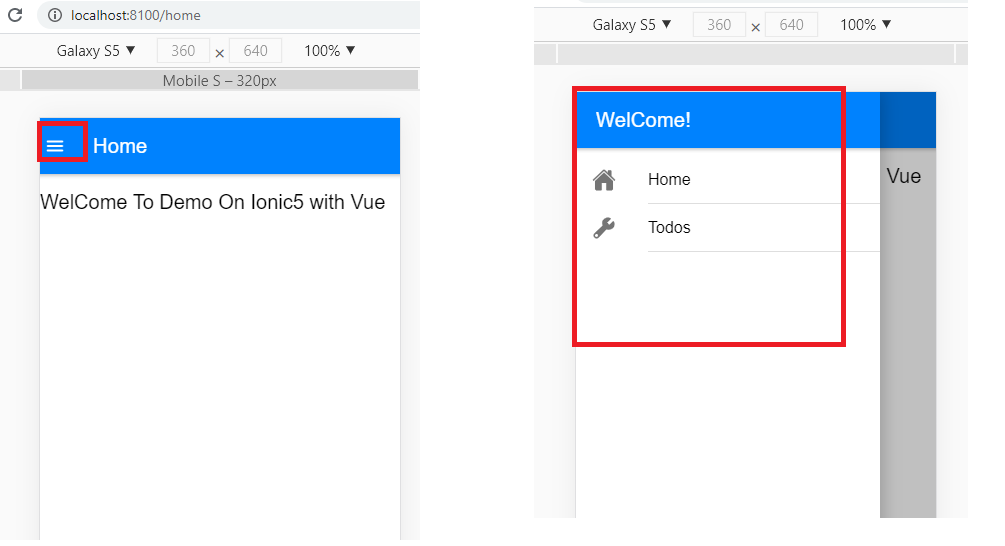
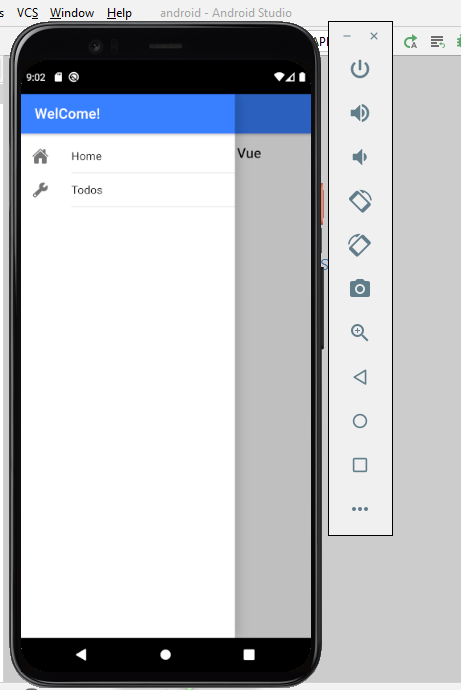
To our application, we are going to add a side menu using the 'IonMenu' component. so let's create our menu and its items as a separate component.
src/components/SideMenu.vue:(Html Part)
<template>
  <ion-menu side="start" menu-id="sidemenu" content-id="mymenu">
    <ion-header>
      <ion-toolbar>
        <ion-title> WelCome! </ion-title>
      </ion-toolbar>
    </ion-header>
    <ion-content>
      <ion-list>
        <ion-item button @click="toPage('/home')">
          <ion-icon :icon="home" slot="start"></ion-icon>
          <ion-label>Home</ion-label>
        </ion-item>
        <ion-item button @click="toPage('/todos')">
          <ion-icon :icon="build" slot="start"></ion-icon>
          <ion-label>Todos</ion-label>
        </ion-item>
      </ion-list>
    </ion-content>
  </ion-menu>
</template>
- Here we render the 'ion-menu' component as the root component. Similar to the 'ion-page' component our 'ion-menu' component also have child components like 'ion-header' and 'ion-content'.
- (Line: 2) Our 'ion-menu' component has the attribute 'menu-id' which defines the name of the menu, we can have n-number of menus in our application that can be determined by using the 'menu-id' attribute value. We used another attribute like 'content-id' that explains on which area of the content this menu should reflect mostly its value should be matched with 'id' value of the 'ion-router-outlet' in App.vue file
- (Line: 10&14) For our 'ion-item' components, we registered click with a callback method and path to be navigated as the input value to the method. We also decorated the 'button' directive this gives nice click transition animation for our menu items.
- (Line: 11&15) For our 'ion-icon' we added the data values like 'home' & 'build' which loads from 'ionicons/icons'.
<script>
import {IonMenu,IonHeader,IonContent,IonToolbar,IonTitle,
  IonList,IonItem,IonIcon,IonLabel,menuController,} from "@ionic/vue";
import { home, build,  } from "ionicons/icons";
import {useRouter} from 'vue-router'
export default {
  components: {
    IonMenu,
    IonHeader,
    IonContent,
    IonToolbar,
    IonTitle,
    IonList,
    IonItem,
    IonIcon,
    IonLabel,
  },
  data() {
    return {
      home,
      build
    };
  },
  setup(){
    const router = useRouter();
    return{
      router
    };
  },
  methods:{
    toPage(path){
      menuController.close('sidemenu');
      this.router.push(path);
    }
  }
};
</script>
- (Line:4) Icon values are loaded from 'ionicons/icons'.
- (Line: 18-23) Icon values are returned as data values.
- (Line: 24-29) Using vue composition API creating the route instance.
- The 'menuController' can access any 'ion-menu' that we have created in our application. Here we are closing the menu on selecting items in it to navigate to the new page.
src/components/MainLayout.vue:(Html Part)
<template>
  <ion-page>
    <ion-header>
      <ion-toolbar>
        <ion-buttons @click="openMenu()" slot="start">
          <ion-icon :icon="menu" slot="start"></ion-icon>
        </ion-buttons>
        <ion-title>{{ pageTitle }}</ion-title>
      </ion-toolbar>
    </ion-header>
    <ion-content>
      <slot></slot>
    </ion-content>
  </ion-page>
</template>
- (Line: 5-7) Add a 'ion-buttons' for invoking the menu.
<script>
import {
  IonPage,IonHeader,IonContent,IonTitle,IonToolbar,
  IonButtons,menuController,IonIcon,} from "@ionic/vue";
import { menu } from "ionicons/icons";
export default {
  components: {
    IonPage,
    IonHeader,
    IonContent,
    IonTitle,
    IonToolbar,
    IonButtons,
    IonIcon,
  },
  props: ["pageTitle"],
  data() {
    return {
      menu,
    };
  },
  methods: {
    openMenu() {
      menuController.open("sidemenu");
    },
  },
};
</script>
- (Line: 24) Using the 'menuController' we are opening the menu by passing the value of the 'menu-id'(in SideMenu.vue file).
src/App.vue:(Html Part)
<template>
  <ion-app>
    <side-menu></side-menu>
    <ion-router-outlet id="mymenu" />
  </ion-app>
</template>
- (Line: 3) Rendered our 'side-menu' component.
- (Line: 4) We added id for the 'ion-router-outlet' this value need to given for 'content-id' of the 'ion-menu' in the 'SideMenu.vue' file.
API Call:
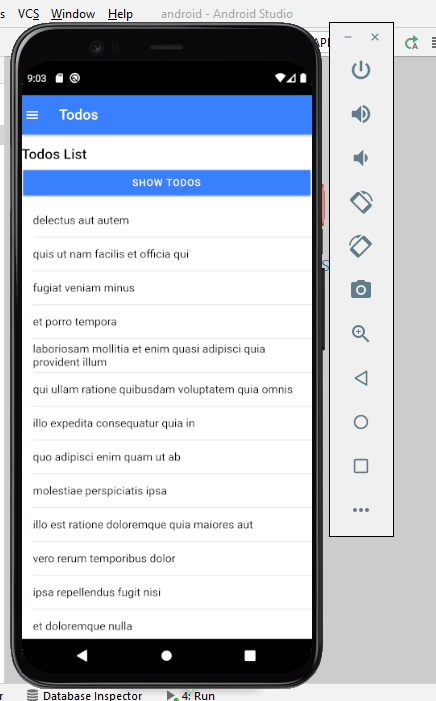
Now in our 'Todo.vue' component, we are going to consume API to display the collection of todo items.
Here we will use frees test todos API like "https://jsonplaceholder.typicode.com/todos"
To consume API calls from the vue component we need to install the 'axios' library.
Command to install axios library
npm install axios
Now update our 'Todos.vue' to fetch the data from our test API.src/pages/Todos.vue:(Html Part)
<template>
    <main-layout pageTitle="Todos">
        <h4>Todos List</h4>
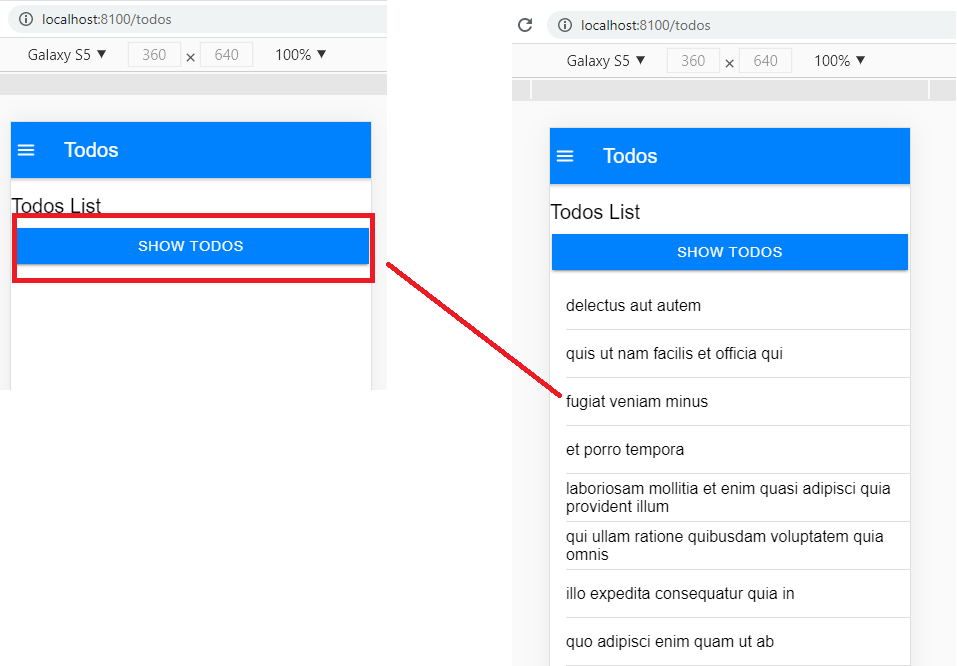
        <ion-button expand="full" @click="showtodos()">show Todos</ion-button>
        <ion-list >
            <ion-item v-for="todo in myTodos" :key="todo.id" >{{todo.title}}</ion-item>
        </ion-list>
    </main-layout>
</template>
- Here on clicking the 'Show Todos' button, we are going to invoke the API and then results will be looped through our 'ion-item' component.
<script>
import {IonButton, IonList, IonItem} from '@ionic/vue';
import axios from 'axios';
export default {
    components:{
        IonButton,
        IonList,
        IonItem
    },
    data(){
        return {
            myTodos:[]
        }
    },
    methods:{
        async showtodos(){
           const response = await axios.get("https://jsonplaceholder.typicode.com/todos");
           this.myTodos = response.data;
        }
    }
}
</script>
Test In Android Mobile Emulator:
So to test in android mobile emulator please make sure to install the android studio on your system.
Now to run our application as an android app we need to use the support of the 'Capacitor'. The Capacitor is a cross-platform native runtime that makes it easy to build modern web apps that run natively on ios, android, and the web.
By creating an application using the Ionic framework 'capacitor' will be added automatically for all the latest applications. So to check that apps are having capacitors installed run the below command.
command to generate capacitor
ionic integrations enable capacitor
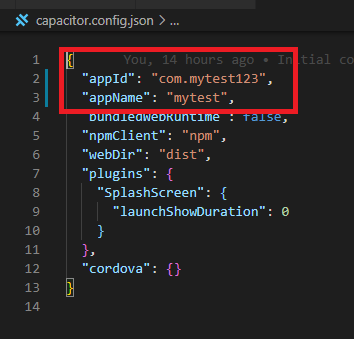
Now we need to initialize the capacitor with app information like application name and application id these values are very important to publish the app.
command to create app name and id with capacitor
npx cap init [appName] [appId]
Running command successfully our app info will be added into the capacitor.cofig.json file.Nex runs the command to generate the android supportive files.command to generate android files
npx cap add android
On running command if you face the following errorThis error occurs because till now we haven't built our project to generate the android files. so to overcome these issues on run command like 'npm run build' and next try again our command like 'npx cap add android'.
After the success of 'npx cap add android' run the following command to open our project in android studio where we can run app on mobile emulator
command to open our code in android studio
npx cap open android
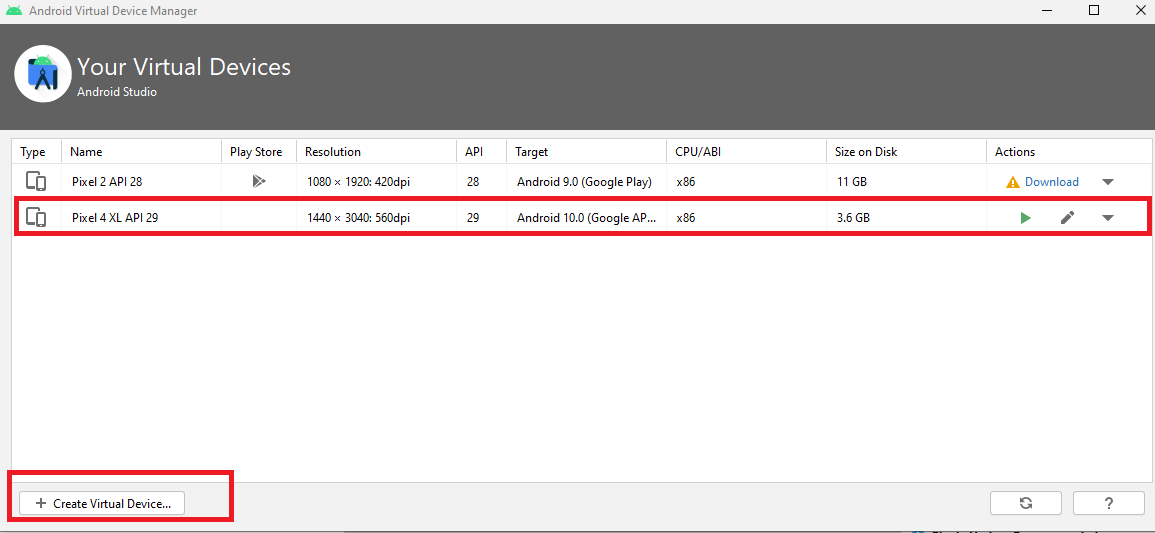
Now before running our application we need to set up an emulator if we don't have one. So to setup emulator in android studio select the 'Tools' menu inside of it a select option like 'AVD Manager' and then create your emulator.Now in the android studio select your emulator and run the application which opens our ionic app in the emulator.
Support Me!
Buy Me A Coffee
PayPal Me
Wrapping Up:
Hopefully, I think this article delivered some useful information on creating a sample Ionic5 Vue application. I love to have your feedback, suggestions, and better techniques in the comment section below.





Excellent !!!
ReplyDeleteOne cut/paste typo:
Now import our layout.css file into the main.js
src/main.js:
import './theme/variables.css';
should be: import './theme/layout.css';
Thanks
DeleteCorrected type mistake