Introduction:
Most of the case's applications are going to communicate with more than one database. Here I'm going to walk through with sample NestJS application which communicates with multiple MongoDB's. Click here to know more about NestJS API CRUD using MongoDB.
MongoDB Atlas:
MongoDB Atlas is a cloud database. It has all the options of creating a MongoDB instance like for Free MongoDB Instance(for learning), Paid MongoDB Instance(for production). To illustrate multiple MongoDB connections for sample application here I'm going to use this Cloud MongoDB Atlas.
It is fairly minimal steps involved for created a Cloud MongoDB instance.
Note:
It is not mandatory to use the cloud based MongoDb database. You can use either locally installed instances like Mongo Shell, MongoDb Compass.
Create Sample NestJS Application:
NestJS provides CLI which helps to create a boilerplate templated application to getting started
NestJS CLI command:
npm i -g @nestjs/cliCommand to create NestJS sample application:
nest new your_application_nameCommands to start the application:
npm run Start:dev
npm run Start:prod
mongoose and @nestj/mongoose:
mongoose and @nestjs/mongoose plugins used to create a communication bridge between MongoDB and NestJS application.
Commands to install:
npm install --save @nestjs/mongoose
npm install --save mongoose
Atlas MongoDB ConnectionString:
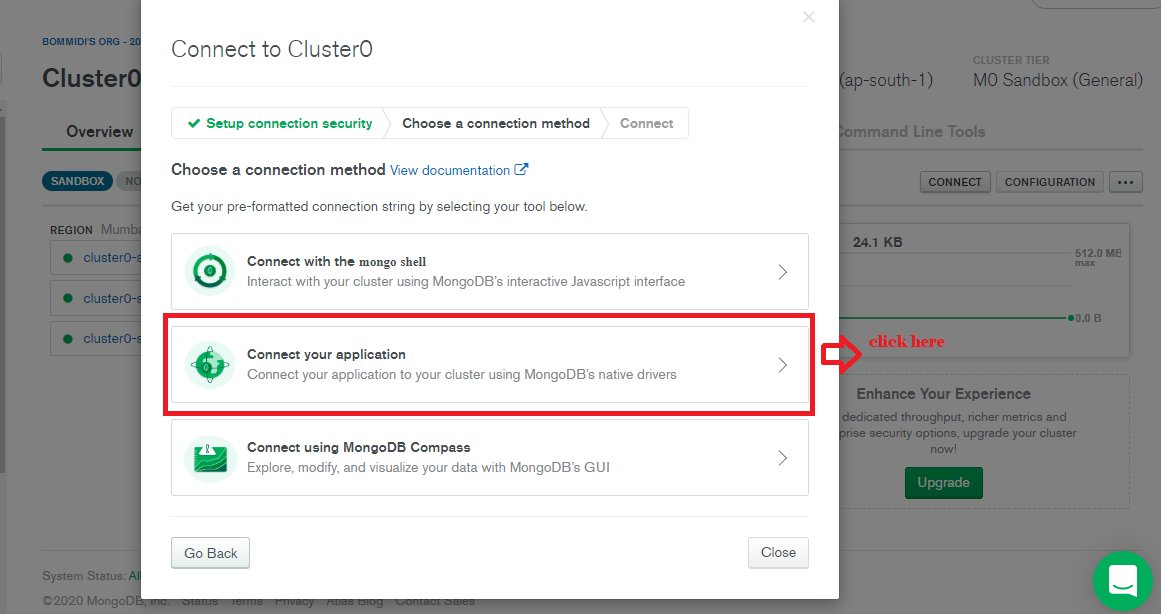
Now we need to fetch the connection string to configure in our NestJS application.
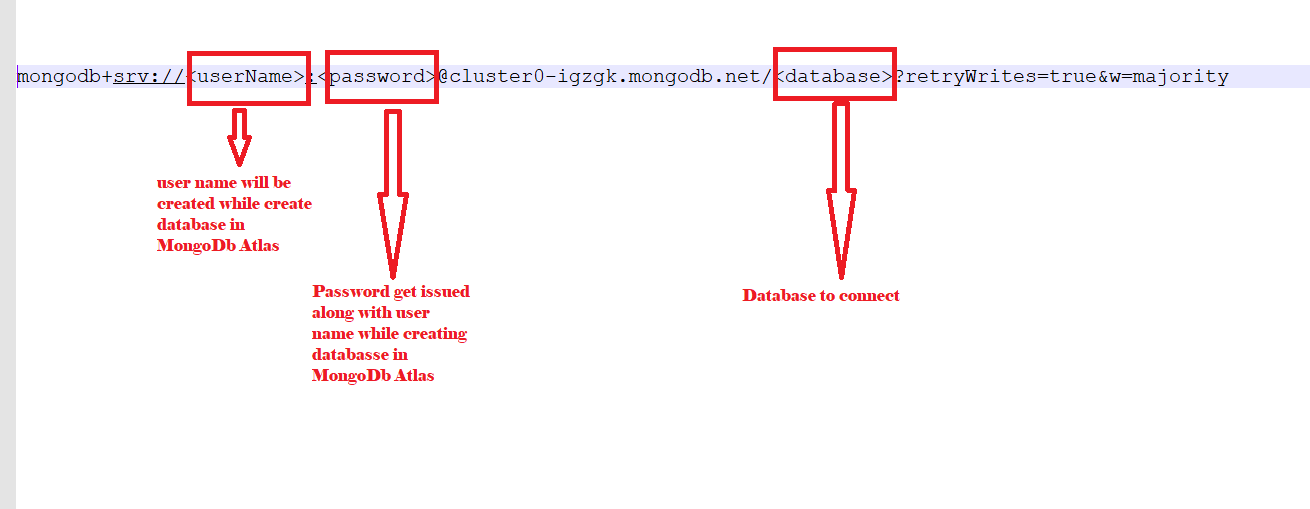
After clicking on the 'Connect your application' tab we can get connection string as below.
Configure Multiple MongoDB:
Configure MongoDB connection as below.
src/app.module.ts:
import { MongooseModule } from '@nestjs/mongoose';
// some code hidden for display purpose
@Module({
  imports: [

    MongooseModule.forRoot(
      'mongodb+srv://<username>:<passowrd>@cluster0-igk.mongodb.net/MyWorld?retryWrites=true&w=majority',
      {
        connectionName: 'myWorldDb'
      }
    ),
    MongooseModule.forRoot(
      'mongodb+srv://<username>:<passowrd>@cluster0-igk.mongodb.net/WildLife?retryWrites=true&w=majority',
      {
        connectionName: 'wildLifeDb'
      }
    )

  ],
})
export class AppModule {}
- Import the MongooseModule from the '@nestjs/mongoose' library.
- 'MongooseModule.forRoot' extension method takes the input parameters like database connection string and options object of type 'MongooseModuleOptions'.
- 'MongooseModuleOptions' interface type has property like 'connectionName' which helps determine the kind of database connection for the specified connection string.
- So on to configure multiple databases can be done by importing the multiple 'MongooseModule.forRoot' as above
- In the sample above connection string, you need to use our own 'username' and 'password' while working with NestJS application with MongoDB
- In the sample above 'MyWorld' and 'WildLife' pointed to the databases I have created in Cloud MongoDB Atlas.
src/schemas/myworld/student.schema.ts:(this schema represents 'MyWorld' database of collection name 'Student')
import * as mongoose from 'mongoose';
export const studentSchema = new mongoose.Schema({
    FirstName:String,
    LastName: String,
    Standard: Number,
    FatherName: String,
    MotherName: String
});
- 'mongoose' library gets imported into the variable name mongoose(import * as mongoose from 'mongoose')
- Using the mongoose variable creating an instance of 'Schema' by registering all MongoDB Collection columns as property into it.
- Now, this schema represents a Collection in MongoDB and using this schema we are able to query the collection.
src/schemas/wildlife/animal.schema.ts:(this scheme represents 'WildLife' database of collection name 'Animals'):
import * as mongoose from 'mongoose';

export const animalSchema = new mongoose.Schema({
    Name:String
})
Now register these Collection(Table) schemas in the application and also need to map them to appropriate database connections follows.
import { Module } from '@nestjs/common';
import { MongooseModule } from '@nestjs/mongoose';
import { studentSchema } from './schemas/myworld/student.schema';
import { animalSchema } from './schemas/wildlife/animal.schema';

@Module({
  imports: [
    MongooseModule.forFeature([
      {
        name: 'Student',
        schema: studentSchema,
        collection: 'Student',

      },
    ],'myWorldDb'),
    MongooseModule.forFeature([
      {
        name: 'Animals',
        schema: animalSchema,
        collection: 'Animals'
      }
    ],'wildLifeDb'),
    MongooseModule.forRoot(
      'mongodb+srv://<userName>:<password>@cluster0-igk.mongodb.net/MyWorld?retryWrites=true&w=majority',
      {
        connectionName: 'myWorldDb'
      }
    ),
    MongooseModule.forRoot(
      'mongodb+srv://<username>:<password>@cluster0-igk.mongodb.net/WildLife?retryWrites=true&w=majority',
      {
        connectionName: 'wildLifeDb'
      }
    )

  ],
  controllers: [],
  providers: [],
})
export class AppModule {}
- 'MongooseModule.forFeature()' extension method used to configure Collection(Table) schemas to their database respectively.
- 'MongooseModule.forFeature()' extension expects 2 optional parameters. First optional parameter is array of type 'ModelDefinition'. Second optional parameter is 'connectionName' this connectionName must match with any one of the connectionName of the database configured in the application.
export declare type ModelDefinition = {
    name: string;
    schema: any;
    collection?: string;
};
- 'name' property to specify the identity of 'ModelDefinition' in a collection of schema registration.
- 'schema' property accepts the Collection(Table) Schema that we have created above.
- 'Collection' property the value should match with MongoDB Collection name
Models/myworld/student.model.ts:(represents 'Student' Collection(Table)):
export interface Student {
  FirstName: String;
  LastName: string;
  Standard: Number;
  FatherName: String;
  MotherName: String;
}
Models/wildlife/animal.model.ts:(represents 'Animals' Collection(Table)):
export interface Animal{
    Name:String
}
Create Service To Query MongoDB:
Services are injectable classes that are used to write logic to communicate with the databases.
services/test.service.ts:
services/test.service.ts:
import {Injectable} from '@nestjs/common';
import { InjectModel } from '@nestjs/mongoose';
import {Model} from 'mongoose';
import {Student} from '../Models/myworld/student.model';
import {Animal} from '../Models/wildlife/animal.model';

@Injectable()
export class TestService{
    constructor(
        @InjectModel('Student') private readonly studentModel:Model<Student>,
        @InjectModel('Animals') private readonly animalModel:Model<Animal>){

        }

    async getStudent(){
        return await this.studentModel.find();
    }

    async getAnimals(){
        return await this.animalModel.find();
    }
}
- '@Injectable()' decorator makes class works with dependency injection. These classes can be accessed from the constructor. '@Injectable' imported from '@nestjs/common'.
- '@InjectModel(Your_Schema_Registered_name)' this helps to inject the schema and helps in the query the MongoDB. '@InjectModel()' is imported from '@nestjs/mongoose'.
- 'Model' from 'mongoose' helps to convert the schema to classes or interface.
- 'find()' method used to query the MongoDB and you can pass some input value to fetch data conditionally. If no input parameter supplied to 'find()' method that means to fetch all data from the Collection(Table).
app.module.ts:
import {TestService} from './services/test.service';
// hidden code for display purpose
@Module({
  providers: [TestService],
})
export class AppModule {}
Test Results:
Now add a Test Controller as follows.
test/test.controller.cs:
import { Controller,Get } from '@nestjs/common';
import { TestService } from '../services/test.service';

@Controller('test')
export class TestController{


    constructor(private testService:TestService){}

    @Get('get')
    async get(){
       return {
           Students: await this.testService.getStudent(),
           Animals: await this.testService.getAnimals()
       }
    }
}
Now register the TestController in the app.module.ts as below.app.module.ts:
import {TestController} from './test/test.controller';
// code hidden for display purpose
@Module({
  imports: [
  controllers: [TestController],
})
export class AppModule {}
Now run the application and call the test controller endpoint.Wrapping Up:
Hopefully, this article will help to understand the accessing multiple MongoDB databases with NestJS application. I love to have your feedback, suggestions and better techniques in the comment section.


Great job there,
ReplyDeleteWhat if I need to pass a dynamic dB Name to the connection.
Such as
I'll get the dBName from another dB and pass to this, from inside the controller.
MongooseModule.forRoot(
'mongodb+srv://:@cluster0-igk.mongodb.net/?retryWrites=true&w=majority',
{
connectionName: 'wildLifeDb'
}
)
Anyone knows how to do this but with Mongoose.forRootAsync ?
ReplyDelete