%20%20angular(v14)%20%20mongodb%20%20crud%20example-24.png)
Create ReactJS Application:
Let's create the ReactJS application to accomplish our demo.
npx create-react-app name-of-your-app
Now install the bootstrap into our application.
npm install bootstrap@5.2.1
Now import the bootstrap CSS file onto the 'index.js'.
src/index.js:
import 'bootstrap/dist/css/bootstrap.min.css'
Install React Hook Form Library:
Let's install the 'React Hook Form' library.
npm install react-hook-form
A Simple Form Using React Hook From Library:
Let's implement a simple form in our 'App' component.
src/App.js:
import logo from "./logo.svg";
import "./App.css";
import { useForm } from "react-hook-form";
function App() {
const {
register,
handleSubmit,
formState: { errors },
} = useForm();
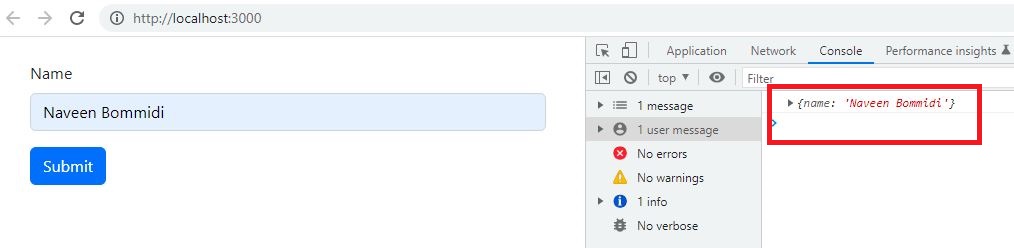
const onformSubmit = (data) => {
console.log(data);
};
return (
<>
<div className="container ">
<div className="row">
<div className="col mt-4 col-md-8 offset-md-2">
<form onSubmit={handleSubmit(onformSubmit)}>
<div className="mb-3">
<label htmlFor="txtname" className="form-label">
Name
</label>
<input
type="text"
className="form-control"
id="txtname"
{...register("name")}
/>
</div>
<button type="submit" className="btn btn-primary">
Submit
</button>
</form>
</div>
</div>
</div>
</>
);
}
export default App;
- (Line: 6-10) The 'useForm' loads from the 'react-hook-form'. The 'register' helps to register the form fields. The 'handleSubmit' helps for form submission. The 'formState:{errors}' to handle the form error messages.
- (Line: 12-14) The 'onFormSubmit' is used by the 'handleSubmit'. The input data of the method will be the form data. In general, in this method, we have to call the API for posting our form data.
- Here since I'm using a normal bootstrap component 2 things we have to do like replace 'class' with 'className' and replace 'for' with 'htmlFor'.
- (Line: 21) Here form register with the 'onSubmit' event. Here 'onSubmit' register with 'handleSubmit' that contains our custom 'onFormSubmit' as input parameter. So on form submission form data will be sent to the 'onFormSubmit'(custom method.).
- (Line: 31) The form input field registered using the 'register' with a name like 'name'(this will be the form property of the input field)
Required Field Validation:
Let's add the 'Required' field validation to the form.
src/App.js:
import logo from "./logo.svg";
import "./App.css";
import { useForm } from "react-hook-form";
function App() {
const {
register,
handleSubmit,
formState: { errors },
} = useForm();
const onformSubmit = (data) => {
console.log(data);
};
return (
<>
<div className="container ">
<div className="row">
<div className="col mt-4 col-md-8 offset-md-2">
<form onSubmit={handleSubmit(onformSubmit)}>
<div className="mb-3">
<label htmlFor="txtname" className="form-label">
Name
</label>
<input
type="text"
className={`form-control ${errors.name ? "is-invalid" : ""}`}
id="txtname"
{...register("name", { required: true })}
/>
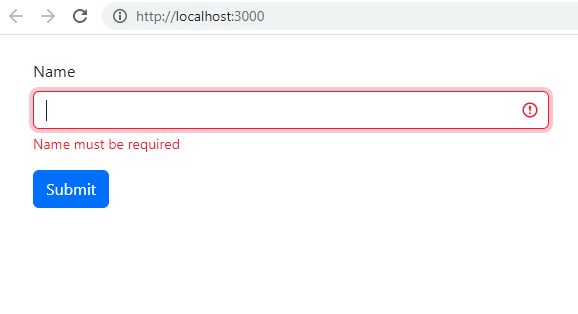
{errors.name && (
<div className="invalid-feedback">Name must be required</div>
)}
</div>
<button type="submit" className="btn btn-primary">
Submit
</button>
</form>
</div>
</div>
</div>
</>
);
}
export default App;
- (Line:30) The 'React Hook Form' supports built-in support for 'required' field validation. For 'register' pass the second parameter like object there we can specify 'required:true' which means we enabled the 'required' field validation for the input element.
- (Line: 28) If our input element validation fails then the 'error.{property_name_for_field}' gets populated with error data. So in our example based on 'error.name' we are adding a bootstrap class like 'is-invalid' which adds red color border for the input field.
- (Line: 32-34) Here in the expression if the first condition yields true then 2nd condition gets rendered(HTML).
Max & Min Range Validation:
Let's add the 'Max' & 'Min' range validations.
src/App.js:
import logo from "./logo.svg";
import "./App.css";
import { useForm } from "react-hook-form";
function App() {
const {
register,
handleSubmit,
formState: { errors },
} = useForm();
const onformSubmit = (data) => {
console.log(data);
};
return (
<>
<div className="container ">
<div className="row">
<div className="col mt-4 col-md-8 offset-md-2">
<form onSubmit={handleSubmit(onformSubmit)}>
<div className="mb-3">
<label htmlFor="txtname" className="form-label">
Age
</label>
<input
type="number"
className={`form-control ${errors.age ? "is-invalid" : ""}`}
id="txtname"
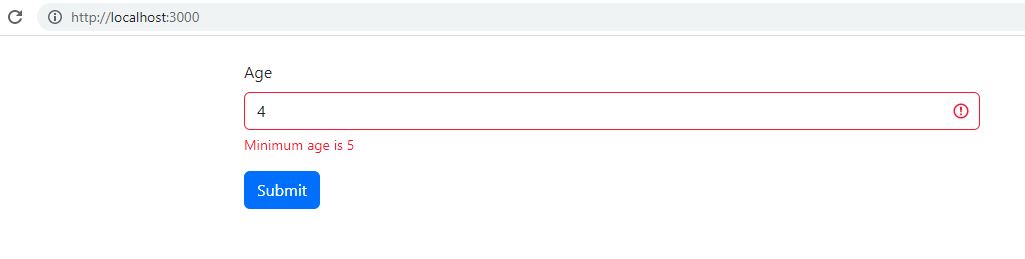
{...register("age", { max: 20, min:5 ,valueAsNumber:true})}
/>
{errors.age?.type === "max" && (
<div className="invalid-feedback">Max age is 20</div>
)}
{errors.age?.type === "min" && (
<div className="invalid-feedback">Minimum age is 5</div>
)}
</div>
<button type="submit" className="btn btn-primary">
Submit
</button>
</form>
</div>
</div>
</div>
</>
);
}
export default App;
- (Line: 30) Here registered our validation like 'max' & 'min' for the input field.
- (Line: 32-37) Based on validation type displays the error message.
Pattern Matching Validation:
Let's implement 'email' validation using the 'pattern' validation.
src/App.js:
import logo from "./logo.svg";
import "./App.css";
import { useForm } from "react-hook-form";

function App() {
  const {
    register,
    handleSubmit,
    formState: { errors }

  } = useForm();

  const onformSubmit = (data) => {
    console.log(data);
  };

  return (
    <>
      <div className="container ">
        <div className="row">
          <div className="col mt-4 col-md-8 offset-md-2">
            <form onSubmit={handleSubmit(onformSubmit)}>

              <div className="mb-3">
                <label htmlFor="txtname" className="form-label">
                  Email
                </label>
                <input
                  type="email"
                  className={`form-control ${errors.email ? "is-invalid" : ""}`}
                  id="txtname"
                  {...register("email", { pattern:/^(([^<>()[\]\\.,;:\s@\"]+(\.[^<>()[\]\\.,;:\s@\"]+)*)|(\".+\"))@((\[[0-9]{1,3}\.[0-9]{1,3}\.[0-9]{1,3}\.[0-9]{1,3}\])|(([a-zA-Z\-0-9]+\.)+[a-zA-Z]{2,}))$/})}
                />
                {errors.email?.type === "pattern" && (
                  <div className="invalid-feedback">Invalid Email Format</div>
                )}

              </div>
              <button type="submit" className="btn btn-primary">
                Submit
              </button>
            </form>
          </div>
        </div>
      </div>
    </>
  );
}
export default App;
- (Line: 32) Added the email validation pattern.
- (Line: 34-36) Checking for email errors and then displaying the message.
Custom Validation:
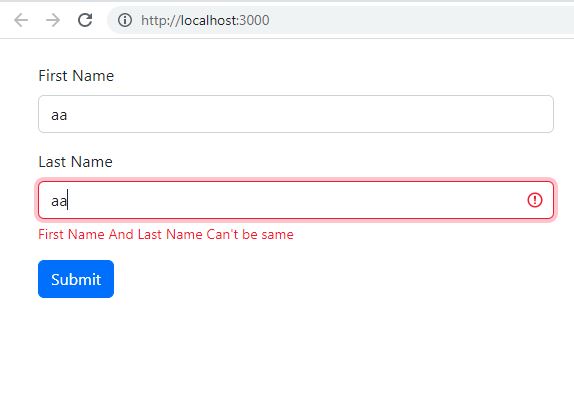
Let's implement the custom validation by comparing values between 2 input fields. Here we will implement a small form that contains 2 fields like 'First Name' and 'Last Name' our custom validation rule will be values in the 2 fields shouldn't match.
src/App.js:
import logo from "./logo.svg";
import "./App.css";
import { useForm } from "react-hook-form";

function App() {
  const {
    register,
    handleSubmit,
    formState: { errors },
    getValues
  } = useForm();

  const onformSubmit = (data) => {
    console.log(data);
  };

  const lastNameAndFirstNameShouldNotEqual = (value) => {
    if(!value || !getValues('firstName')){
      return true
    }
    return value  !== getValues('firstName');
  }

  return (
    <>
      <div className="container ">
        <div className="row">
          <div className="col mt-4 col-md-8 offset-md-2">
            <form onSubmit={handleSubmit(onformSubmit)}>
              <div className="mb-3">
                <label htmlFor="txtname" className="form-label">
                  First Name
                </label>
                <input
                  type="test"
                  className={`form-control`}
                  id="txtname"
                  {...register("firstName")}
                />

              </div>
              <div className="mb-3">
                <label htmlFor="txtname" className="form-label">
                  Last Name
                </label>
                <input
                  type="text"
                  className={`form-control ${errors.lastName ? "is-invalid" : ""}`}
                  id="txtname"
                  {...register("lastName", { validate: lastNameAndFirstNameShouldNotEqual})}
                />
                {errors.lastName?.type === "validate" && (
                  <div className="invalid-feedback">First Name And Last Name Can't be same</div>
                )}

              </div>
              <button type="submit" className="btn btn-primary">
                Submit
              </button>
            </form>
          </div>
        </div>
      </div>
    </>
  );
}
export default App;
- (Line: 10) The 'getValue' from the 'useForm' helps to read the values of the input fields of the form.
- (Line: 17-22) The 'lastNameAndFirstNameShouldNotEqual' function is our custom validation function. If it returns 'true' then no error if 'false' then error. The input value for this function will be the HTML element value to which this method registered. Here using 'getValue' we are fetching the other HTML input field value.
- (Line: 50) Our custom validation function is registered with the 'validate' field.
- (Line: 52-54) Checking for custom validation error and then displaying the error message.
Support Me!
Buy Me A Coffee
PayPal Me
Video Session:
Wrapping Up:
Hopefully, I think this article delivered some useful information on the React JS(v18) Form Validations Using React Hook Form Library. I love to have your feedback, suggestions, and better techniques in the comment section below.
It was really helpful!
ReplyDelete