Create A Sample App Of Ionic5 Using Vue :
Command to install latest Ionic CLI:
npm install -g @ionic/cli@latest
Now run the following command to create Ionic5 using the Vue application.
Command to create Ionic Vue application
ionic start your_app_name blank --type vue
Now run the following command to install Vuex into our Ionic&Vue app.
Vuex Command
npm install vuex@next --save
TypeScript Or Javascript:
- Remove TypeScript dependencies.
command to unistall the typescript dependencies
npm uninstall --save typescript @types/jest @typescript-eslint/eslint-plugin @typescript-eslint/parser @vue/cli-plugin-typescript @vue/eslint-config-typescript- We need to change the file extensions from ".ts" to ".js", we mostly have 2 '.ts files' like 'main.ts' and 'router/index.ts'.
- In the '.eslintrc.js' file needs to remove the '@vue/typescript/recommended' from the 'extends' array property and next need to remove the @typescript-eslint/no-explicit-any': 'off' property from the rules object.
- Now remove the 'Array<RouteRecordRaw>' type in 'router/index.js'.
- Delete the 'shims-vue.d.ts' file.
- Remove the 'lang="ts"' attribute on script tag in our '.vue' files like 'App.vue' and 'view/Home.vue'.
Create Pages Vue Component:
- Delete the 'views/Home.vue' and 'views' folder.
- Remove the 'Home.vue' route and its configuration from the 'router/index.js' file.
<template>
  <div>
    <h4>My Users Page</h4>
  </div>
</template>
<script>
export default {};
</script>
Configure route to our 'Users.vue' component.import { createRouter, createWebHistory } from "@ionic/vue-router";
import Users from "../pages/Users.vue";
const routes = [
{
path: "/",
redirect: "/users",
},
{
path: "/users",
component: Users,
},
];
const router = createRouter({
history: createWebHistory(process.env.BASE_URL),
routes,
});
export default router;
Add Master Layout Vue Component:
- IonPage
- IonHeader
- IonContent
- IonTitle
- IonToolbar
<template>
  <ion-page>
    <ion-header>
      <ion-toolbar>
        <ion-title>{{ pageTitle }}</ion-title>
      </ion-toolbar>
    </ion-header>
    <ion-content>
      <slot> </slot>
    </ion-content>
  </ion-page>
</template>
<script>
import {
  IonPage,
  IonHeader,
  IonContent,
  IonToolbar,
  IonTitle
} from "@ionic/vue";
export default {
  components: {
    IonPage,
    IonHeader,
    IonContent,
    IonToolbar,
    IonTitle,
  },
  props: ["pageTitle"],

};
</script>
<style scoped>
ion-toolbar{
    --background: var(--ion-color-primary);
    --color: var(--ion-color-primary-contrast)
}
</style>
- Here we have defined our master template using the Ionic core components.
- The '<slot>' tag is the area in which our routed page content will be rendered.
- The page title of each page will be passed dynamically using the input properties using the 'props'.
- Applied some styles to our 'ion-toolbar' component.
import MasterLayout from './components/MasterLayout.vue';
// code hidden for display purpose
app.component('master-layout',MasterLayout);
Now update our 'Users.vue' component to use 'MasterLayout.vue'.<template>
<master-layout pageTitle="Users">
<div>
<h4>My Users Page</h4>
</div>
</master-layout>
</template>
<script>
export default {};
</script>
Vuex Core Building Blocks:
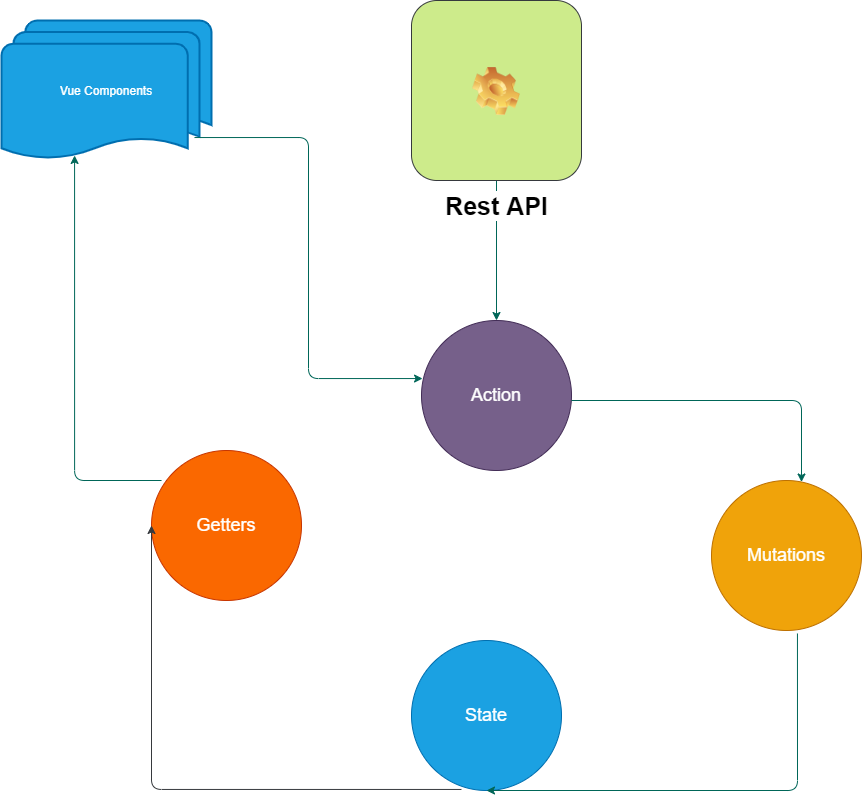
Actions: Actions are task performers which have the capabilities to do either synchronous or asynchronous operations. In Vuex actions are used to invoke the rest API's to fetch the data and then actions call mutations to change the store state. To invoke mutations actions use a command called 'commit'. This 'commit' command invokes appropriate mutation and receives the rest API data as input to save into the store state.
Mutations: Mutations are to perform mutable operations. In Vuex the only option to change the state of the store is to use mutations. So the only way to add or update the data of the Vuex store is done by mutations.
State: State is a simple javascript object literal. A Vuex store saves or holds the data in the state object.
Getters: Getters are to perform tasks to retrieve the data from the Vuex store state. Getters are helped to retrieve data and then we can bind the data to components. So using these Getters in n-number of Vue Components can share the same data from the Vuex store.
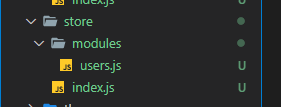
Setup Vuex Store:
const state = () => ({

});

const getters = {};

const actions = {};

const mutations = {};

export default{
    namespaced: true,
    state,
    getters,
    actions,
    mutations
}
- (Line: 1-3) The 'state' stores all data.
- (Line: 5) The 'getters' contains all the functions are methods to fetch the data from the 'state'.
- (Line: 7) The 'actions' are to perform async jobs like calling API.
- (Line: 9) The 'mutations' contain a function that has the capability to modify the 'state'.
- (Line: 12) Enabled namespace for our store while invoking 'getters' or 'actions' or 'mutations' we need specify the namespace. This namespace value is equal to the property name of the module where our store will register in upcoming steps.
import userModule from './modules/users';
import {createStore} from 'vuex';

const store = createStore({
    modules:{
        users: userModule
    }
});

export default store;
- Here we registering our store as a module to the property 'users'. Theis 'users' property name will be used as a namespace.
import store from './store/index';
// code hidden for display purpose
app.use(store);
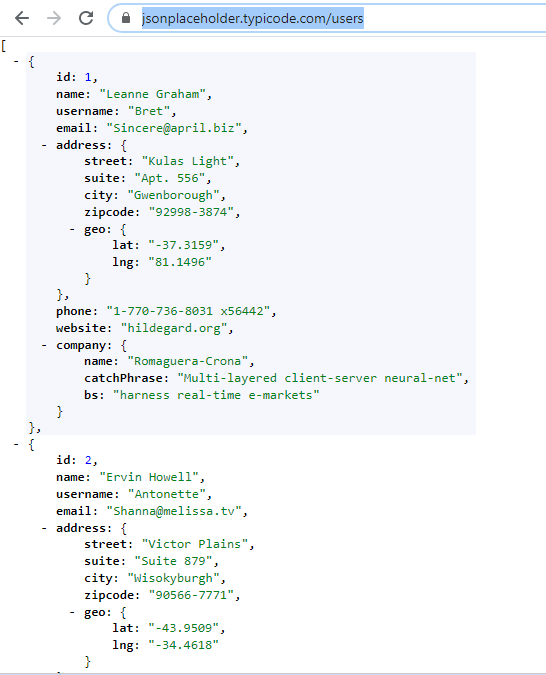
Rest API:
Its response result looks as below:
Create Store Action That Going To Invoke Endpoint:
Command To Install Axios
npm install axios
Now let's create an action method that will consume the rest API.const actions = {
async fetchUsers(){
var response = await axios.get("https://jsonplaceholder.typicode.com/users");
console(response.data);
}
};
Create a Store Mutation To Update Store State:
const state = () => ({
    users:[]
});
Now create a mutation method to update the store state.const mutations = {
saveAllUsers(state, payload){
state.users = payload;
}
};
- Here first parameter 'state' automatically passed by the framework, second parameter 'payload' data to store the data into the store.
const actions = {
    async fetchUsers({commit}){
       var response =  await axios.get("https://jsonplaceholder.typicode.com/users");
       commit('saveAllUsers', response.data);
    }
};
- Here 'commit' input parameter automatically passed to the action method by the vuex. The 'commit' command is used to invoke the mutation. The first input parameter is the name of the mutation method and the second method is to save the payload.
Create A Getter Method To Fetch Users:
const getters = {
    allUsers(state){
        return state.users;
    }
};
Users Page Access Data From The Store:
<template>
  <master-layout pageTitle="Users">
    <div>
      <ion-button expand="full" @click="showUsers()">Show Users</ion-button>
      <ion-card v-for="user in allUsers" :key="user.id">
        <ion-card-content>
          <ion-card-title>{{user.name}}</ion-card-title>
        </ion-card-content>
        <ion-item>
          <ion-label>Email</ion-label>{{user.email}}
        </ion-item>
      </ion-card>
    </div>
  </master-layout>
</template>
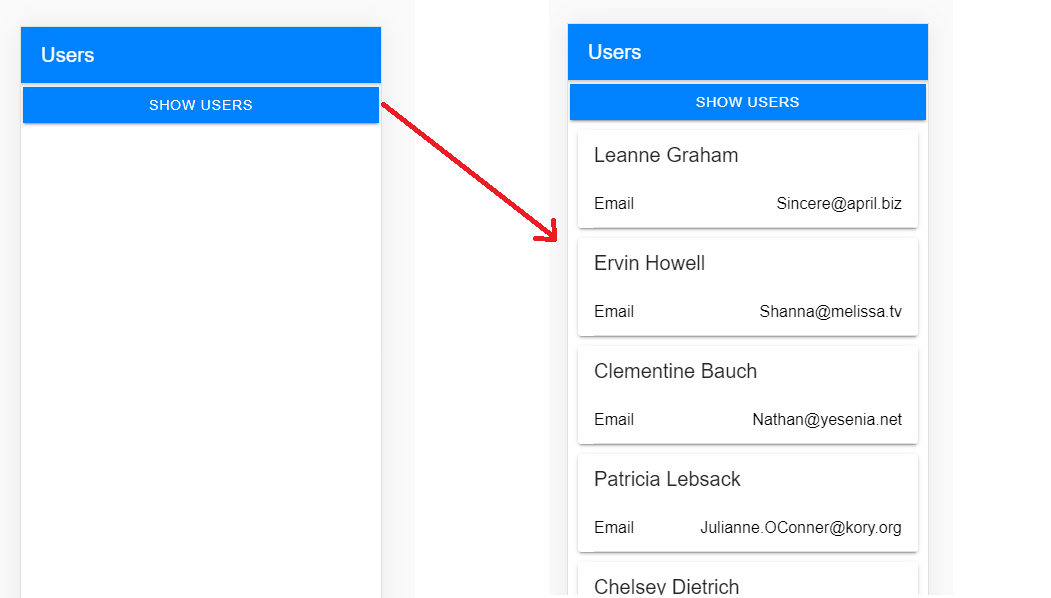
- (Line: 4) The button invokes the method for calling the rest API.
- (Line: 5-12) The ion-card' component displays the user's data.
<script>
import {mapGetters,mapActions} from 'vuex';
import {IonButton, IonCard, IonCardContent, IonCardTitle, IonItem, IonLabel} from '@ionic/vue';
export default {
  components:{
    IonButton,
    IonCard,
    IonCardContent,
    IonCardTitle,
    IonItem,
    IonLabel
  },
  computed:{
    ...mapGetters('users',{
      allUsers:'allUsers'
    })

  },
  methods:{
    ...mapActions('users',{
      fetchUsers:'fetchUsers'
    }),
    async showUsers(){
      await this.fetchUsers();
    }
  }
};
</script>
- (Line: 2) Importing the 'mapGetters' and 'mapActions' from 'Vuex'.
- (Line: 3) Imported all required ionic components for our page display.
- (Line: 14-16) Using the 'mapGetters' method registering the store getter method. Since getters are to fetch the data, so getters should be registered inside of the 'computed' properties which listen for the latest changes. Here the first parameter of 'mapGetters' is namespace('users' is namespace).
- (Line: 20-22) Using the 'mapActions' method registering the store action method. Since actions are to invoke the API call, so getters can be registered inside of the 'methods' property.
- (Line: 23-25) Triggering the action method on clicking the button.
Create Store Action And Mutation For Create User:
const actions = {
    async addUser({commit}, payload){
        // since our rest api only support get
        // here we simply update the store state
        commit('addUser', payload);
    },

};

const mutations = {

    addUser(state,payload){
	// this line of code is fake , when we have save no nedd to write this line
        payload.id = (state.users.length + 1);
        state.users.unshift(payload);
    }
};
- (Line: 2-6) Action method for creating a new user. Here we don't have a post endpoint so for demo purposes we just going to store data to the state.
- (Line: 12-16) Mutation to adding our new record to 'users' state.
Create A Store Getters, Actions, And Mutations To Update User:
const getters = {
    userById(state){
        return (id) => {
            return state.users.find(u => u.id == id);
        }
    }
};

const actions = {
    async updateUser({commit}, payload){
         // since our rest api only support get
        // here we simply update the store state
        commit('updateUser', payload);
    }
};

const mutations = {
    updateUser(state, payload){
        let filteredUsers = state.users.filter(u => u.id !== payload.id);
        filteredUsers.unshift(payload);
        state.users = filteredUsers;
    }
};
- (Line: 2-6) The getter method to fetch the filtered user. This getter will be used for updating the record.
- (Line: 10-14)The action method needs to trigger the update API and then invoke mutation to store the latest data(For our sample we don't have API to update).
- (Line: 18-22) The mutation method of updating our new data into the store.
Add Or Update Page Vue Component:
<template>
  <master-layout :pageTitle="pageTitle">
    <ion-card>
      <ion-card-header>
        <ion-card-title></ion-card-title>
      </ion-card-header>
      <ion-card-content v-if="userInfo">
        <ion-item>
          <ion-label position="floating">User Name</ion-label>
          <ion-input v-model="userInfo.name"></ion-input>
        </ion-item>
        <ion-item>
          <ion-label position="floating">Email</ion-label>
          <ion-input v-model="userInfo.email"></ion-input>
        </ion-item>
        <ion-button expand="full" @click="saveorupdate()">{{
          btnText
        }}</ion-button>
      </ion-card-content>
    </ion-card>
  </master-layout>
</template>
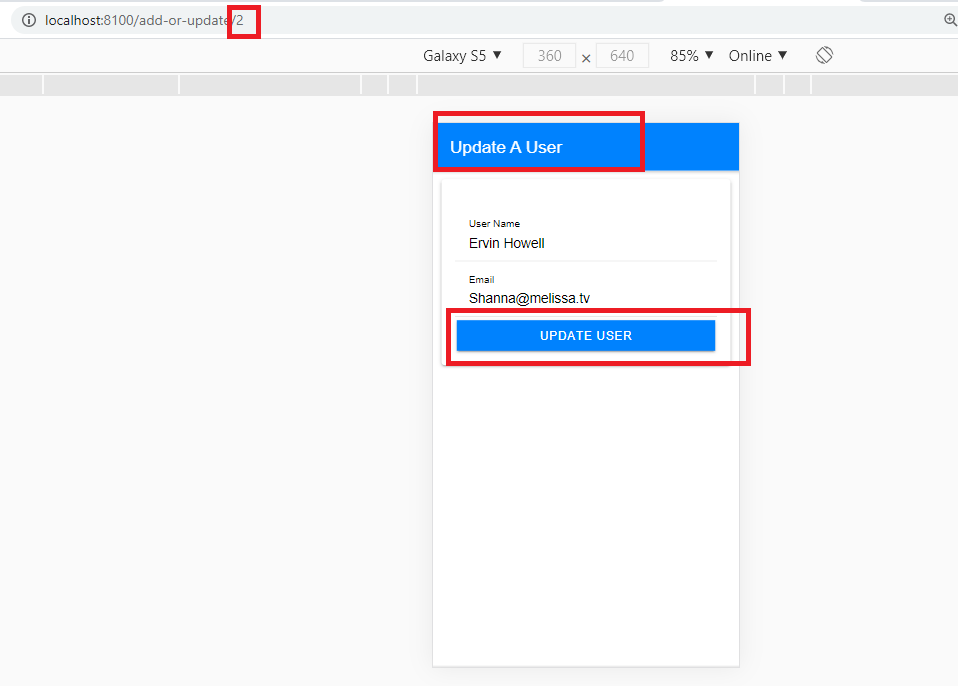
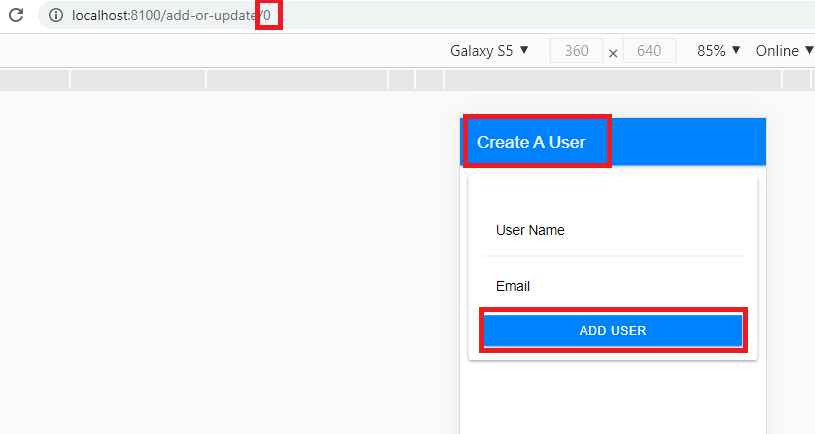
- (Line: 2) The 'pageTitle' property of dynamic value which will display different page title on rendering.
- Here we created a small form inside of the 'ion-card' this form will be used for both adding and editing the user records.
- The property 'userInfo' is used for the model binding.
- The 'saveorupdate()' callback method registered for the button.
- (Line: 17) Displaying button text dynamically.
<script>
import { mapActions, mapGetters } from "vuex";
import {
IonCard,IonCardHeader,IonCardTitle,IonCardContent,IonItem,IonLabel,IonInput,IonButton,
} from "@ionic/vue";
export default {
  components: {
    IonCard,IonCardHeader,IonCardTitle,IonCardContent,IonItem,IonLabel,IonInput,IonButton,
  },
  data() {
    return {
      userInfo: null,
      routeId: this.$route.params.id,
      btnText: "",
      pageTitle: ""
    };
  },
  computed: {
    ...mapGetters("users", {
      userById: "userById",
    }),
  },
  mounted() {
    if (this.routeId == 0) {
      this.userInfo = {
        id: 0,
        name: "",
        emai: "",
      };
      this.btnText = "Add User";
      this.pageTitle = "Create A User";
    } else {
      this.userInfo = this.userById(this.routeId);
      this.btnText = "Update User";
      this.pageTitle = "Update A User";
    }
  },
  methods: {
    ...mapActions("users", {
      addUser: "addUser",
      updateUser: "updateUser",
    }),
    saveorupdate() {
      if (this.userInfo.id == 0) {
        this.addUser(this.userInfo);
        this.$router.push("/users");
      } else {
        this.updateUser(this.userInfo);
        this.$router.push("/users");
      }
    },
  },
};
</script>
- (Line: 13) Fetching the user id from the route.
- (Line: 19-21) Registered the 'userById' getter method.
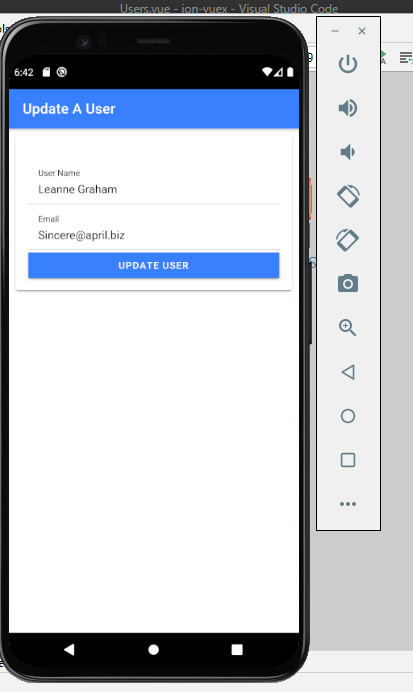
- (Line: 23-36) If the new user that is user 'id' is zero then just assign empty data to the 'userInfo' object and also assign 'pageTitle', 'btnText' values that represent adding record. If the user 'id' greater than zero means updating the record then we will assign 'userInfo' object data from the 'userById' getter method.
- (Line: 39-42) Registering the action methods like 'addUser' and 'updateUser'.
- (Line: 43-51)Logic to invoke 'addUser' or 'updateUser'.
import AddOrUpdateUser from "../pages/AddOrUpdateUser";

const routes = [
  {
    path: "/add-or-update/:id",
    component: AddOrUpdateUser
  },
];
Buttons Like Add, Edit, And Delete:
<template>
  <master-layout pageTitle="Users">
    <div>
      <ion-button expand="full" @click="showUsers()">Show Users</ion-button>
      <ion-card v-for="user in allUsers" :key="user.id">
        <ion-card-content>
          <ion-card-title>{{ user.name }}</ion-card-title>
        </ion-card-content>
        <ion-item> <ion-label>Email</ion-label>{{ user.email }} </ion-item>
         <ion-item>
           <ion-buttons>
             <ion-icon @click="edit(user.id)" :icon="create" slot="end"></ion-icon>
             <ion-icon :icon="trash" slot="end"></ion-icon>
           </ion-buttons>
        </ion-item>
      </ion-card>
    </div>
    <template v-slot:footerdata>
      <ion-fab vertical="bottom" horizontal="end">
        <ion-fab-button routerLink="/add-or-update/0">
          <ion-icon :icon="add"></ion-icon>
        </ion-fab-button>
      </ion-fab>
    </template>
  </master-layout>
</template>
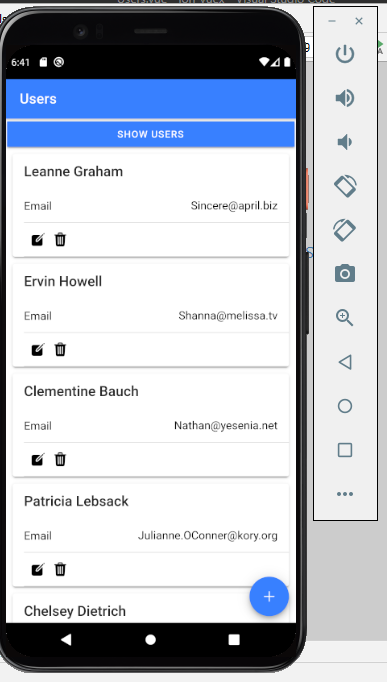
- (Line: 12) Edit button on each card registered with the 'edit' callback method.
- (Line: 18-24) Added template with slot based rendering on the MasterLayout.vue. This template contains 'ion-fab-button' that will navigate us to 'AddOrUpdateUser.vue' with the user id in the URL as '0'.
<script>
import { mapGetters, mapActions } from "vuex";
import {
  IonButton,IonCard,IonCardContent,IonCardTitle,IonItem,IonLabel,IonFab,IonFabButton,IonIcon,IonButtons
} from "@ionic/vue";
import { add, create,trash } from "ionicons/icons";
export default {
  components: {
    IonButton,IonCard,IonCardContent,IonCardTitle,IonItem,IonLabel,IonFab,IonFabButton,IonIcon,IonButtons
  },
  computed: {
    ...mapGetters("users", {
      allUsers: "allUsers",
    }),
  },
  methods: {
    ...mapActions("users", {
      fetchUsers: "fetchUsers",
    }),
    async showUsers() {
      await this.fetchUsers();
    },
    edit(id){
      this.$router.push(`/add-or-update/${id}`);
    }
  },
  data() {
    return {
      add,
      create,
      trash
    };
  },

};
</script>
- (Line: 23-25) Navigating to the update page by passing user-id dynamic value.
- (Line: 27-33) Loading the 'ion-icons'
// code hidden for display purpose
<template>
  <ion-page>
    <ion-footer>
        <slot name="footerdata"></slot>
    </ion-footer>
  </ion-page>
</template>
<script>
import {
} from "@ionic/vue";
export default {
  components: {
    IonFooter
  }
</script>
Create Action And Mutation For Deleting User:
const actions = {

    async deleteUser({commit}, id){
         // since our rest api only support get
        // here we simply update the store state
        commit('deleteUser', id);
    }
};

const mutations = {
    deleteUser(state, id){
        state.users = state.users.filter(u => u.id !== id);
    }
};
- The action method needs to call API and then invoke the mutation to update the state.
- Mutation here removing the item match for the 'id' value from the state.
Update User.vue Delete Button:
// code hidden for the display purpose
<ion-icon @click="edit(user.id)" :icon="create" slot="end"></ion-icon>
<script>

export default {
  methods: {
    ...mapActions("users", {
      fetchUsers: "fetchUsers",
      deletUserAction: "deleteUser"
    }),
    deleteUser(id){
      this.deletUserAction(id);
    }
  },

};
</script>
- Registered 'deleteUser' store action method and used inside of the delete callback method to remove the item from the state.
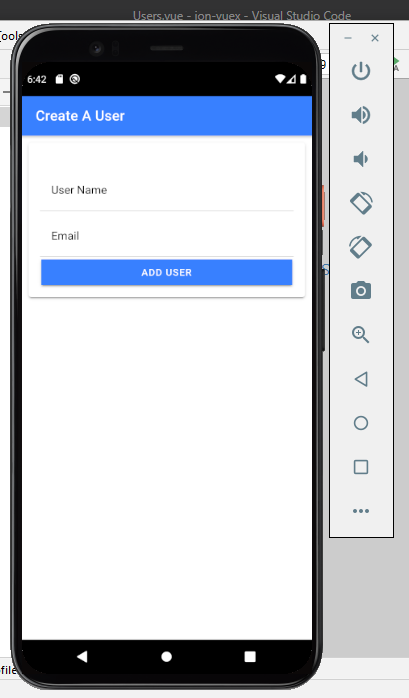
Test In Android Emulator:
Support Me!
Buy Me A Coffee
PayPal Me



Comments
Post a Comment